


BUSA 1/4 Scale Fokker Dr 1
 09-25-2013, 07:04 PM
#126
Sub wing is completed:
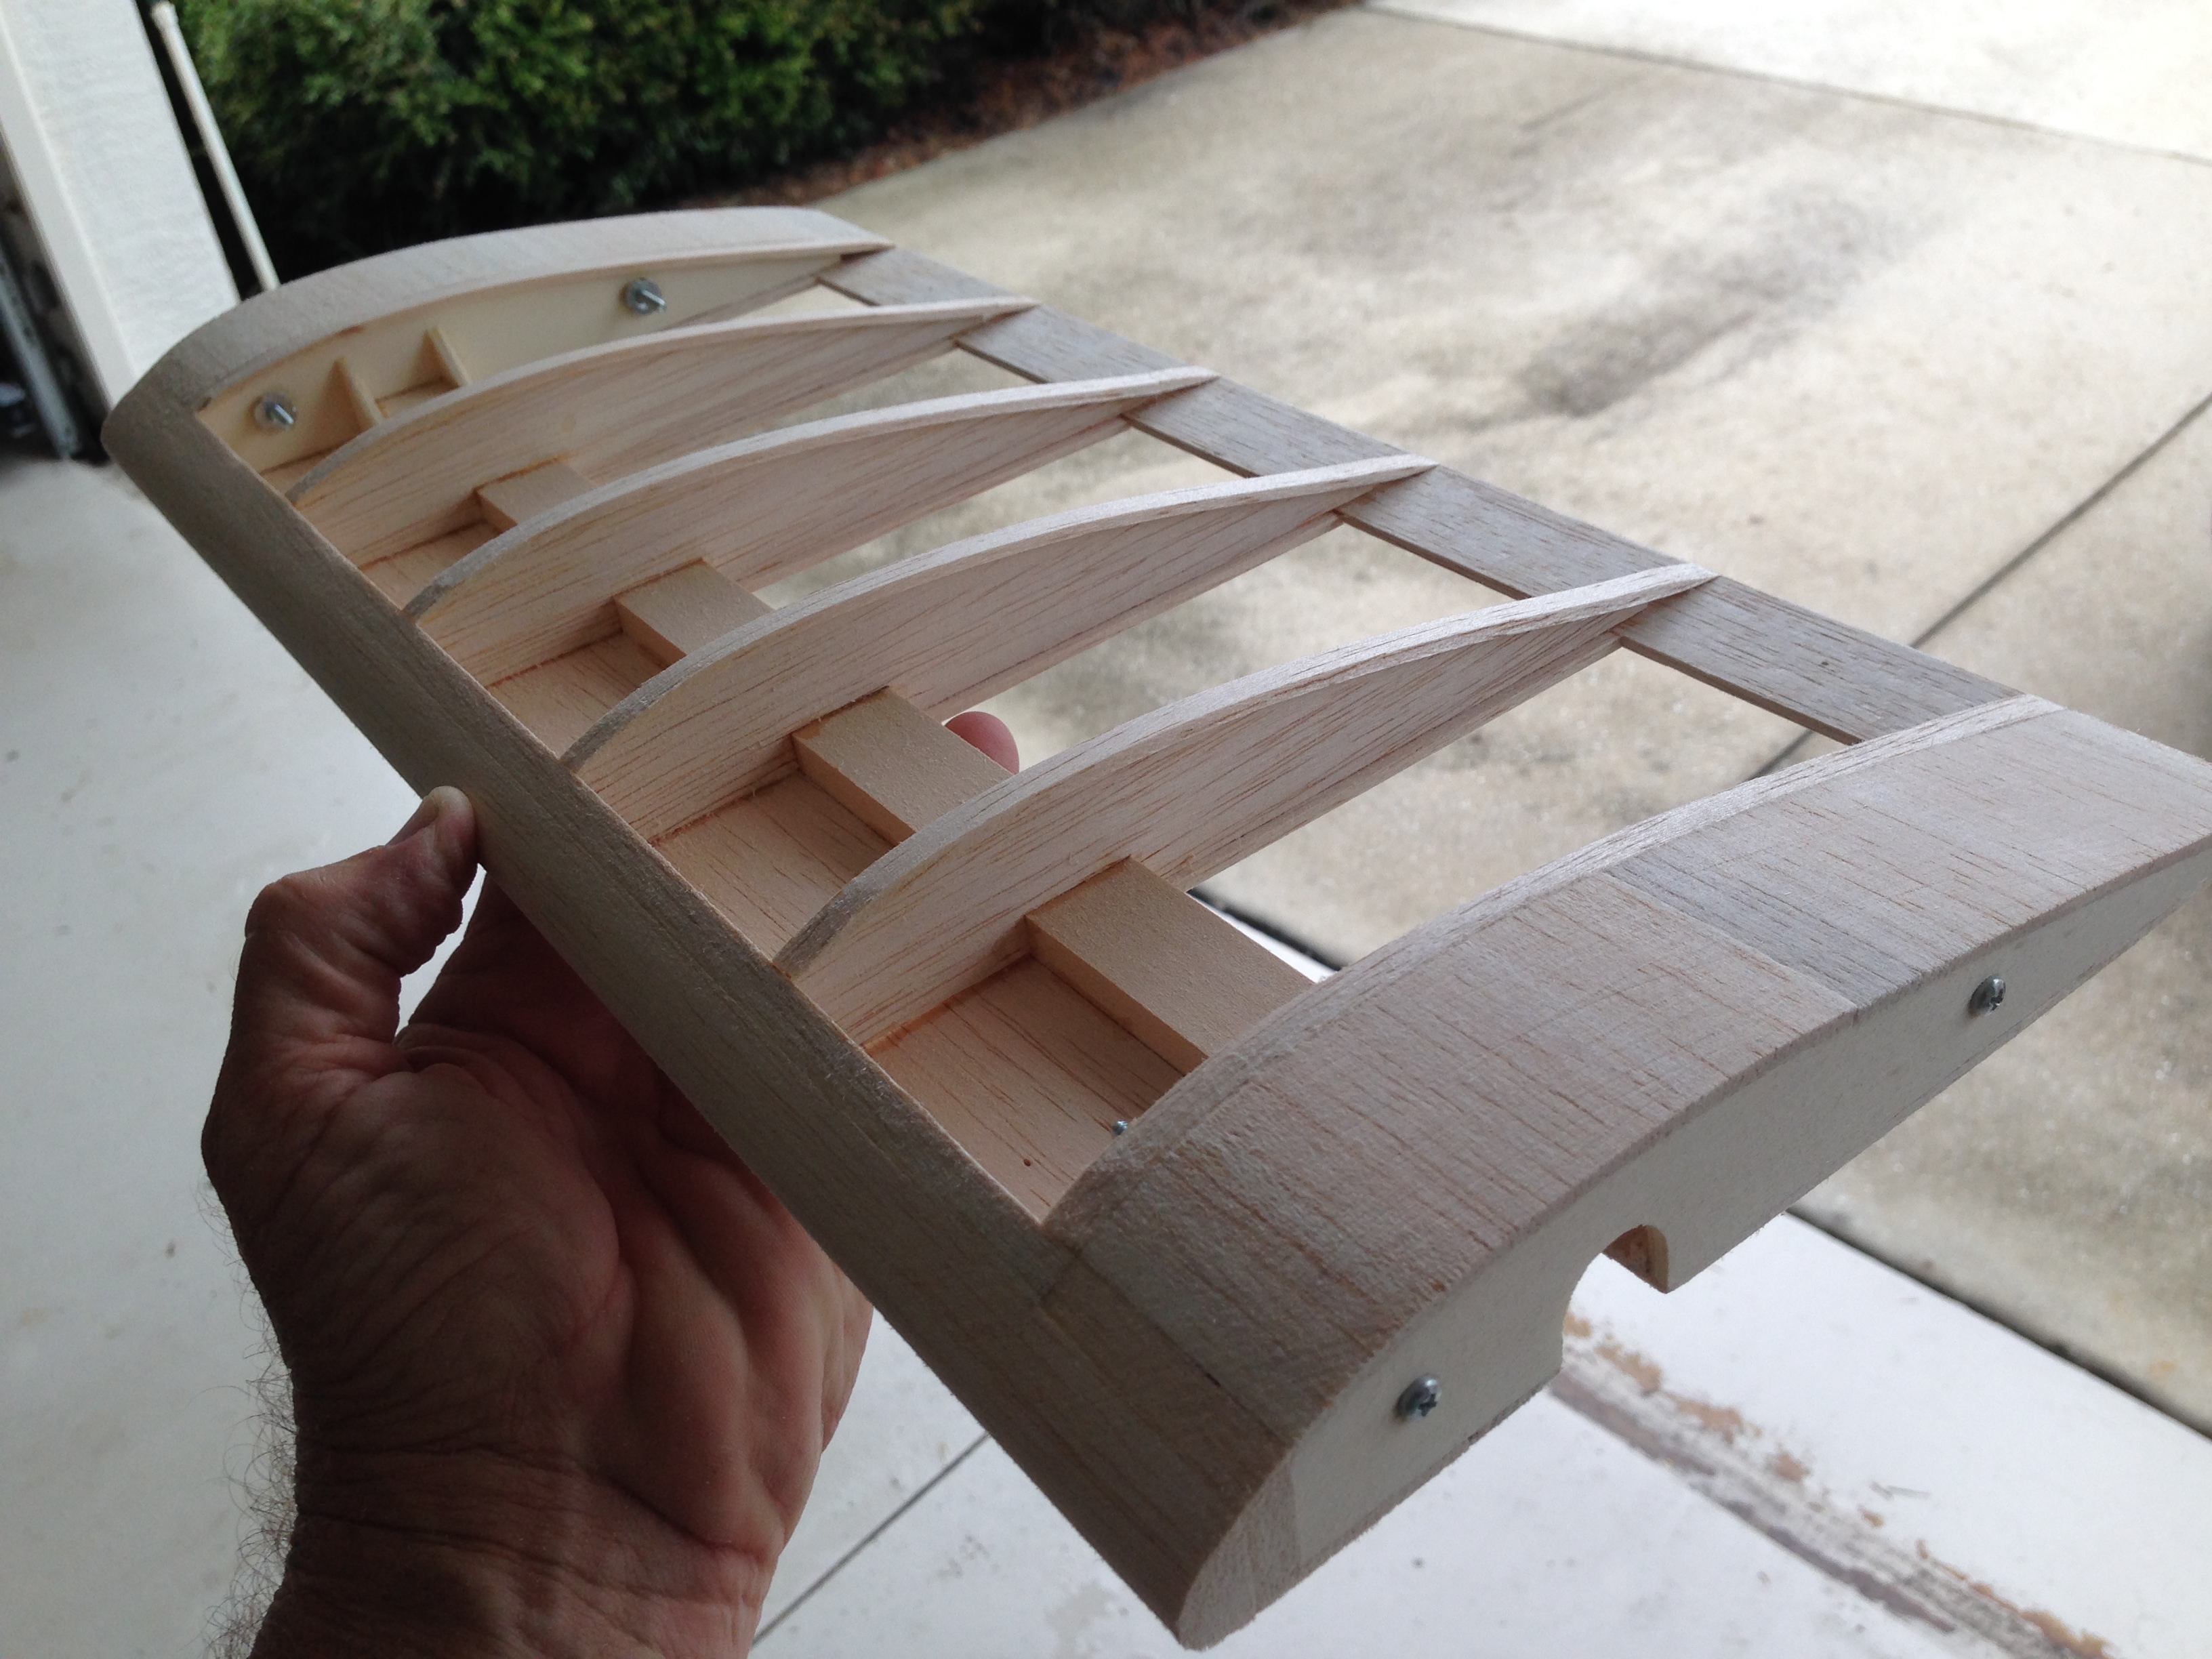
Not to bad. I hope it doesn't fall apart after a few flights. I'm already wishing I had fully sheeted and glassed it. I was not overly happy with the way BUSA wanted it attached to the axle. Specifically, the arms that keep it from rotating. So, instead of trying to solder the "L" shaped wire to the axle, I turned them into sort of a shepard's crook." Don't know if it's gonna work better or not.

My plan is to crimp them in place. Stabilize them with some thick CA, then wrap and solder. Unfortunately, the last part of the plan will have to wait until tomorrow as I ran out of silver solder.

Not to bad. I hope it doesn't fall apart after a few flights. I'm already wishing I had fully sheeted and glassed it. I was not overly happy with the way BUSA wanted it attached to the axle. Specifically, the arms that keep it from rotating. So, instead of trying to solder the "L" shaped wire to the axle, I turned them into sort of a shepard's crook." Don't know if it's gonna work better or not.
My plan is to crimp them in place. Stabilize them with some thick CA, then wrap and solder. Unfortunately, the last part of the plan will have to wait until tomorrow as I ran out of silver solder.
This is how I did it on my new one. The brace that was used later on the full scale.


 09-26-2013, 01:26 PM
#128

Thread Starter
My Feedback: (7)
Join Date: Jan 2004
Location: Parrish,
FL
Posts: 206
Likes: 0
Received 0 Likes
on
0 Posts
I soldered my sub wing "stays" in place this morning. Not showing the solder job, one of the ugliest I've done. Some thick black paint will make it look much better. Anyhow, the sub wing is attached:
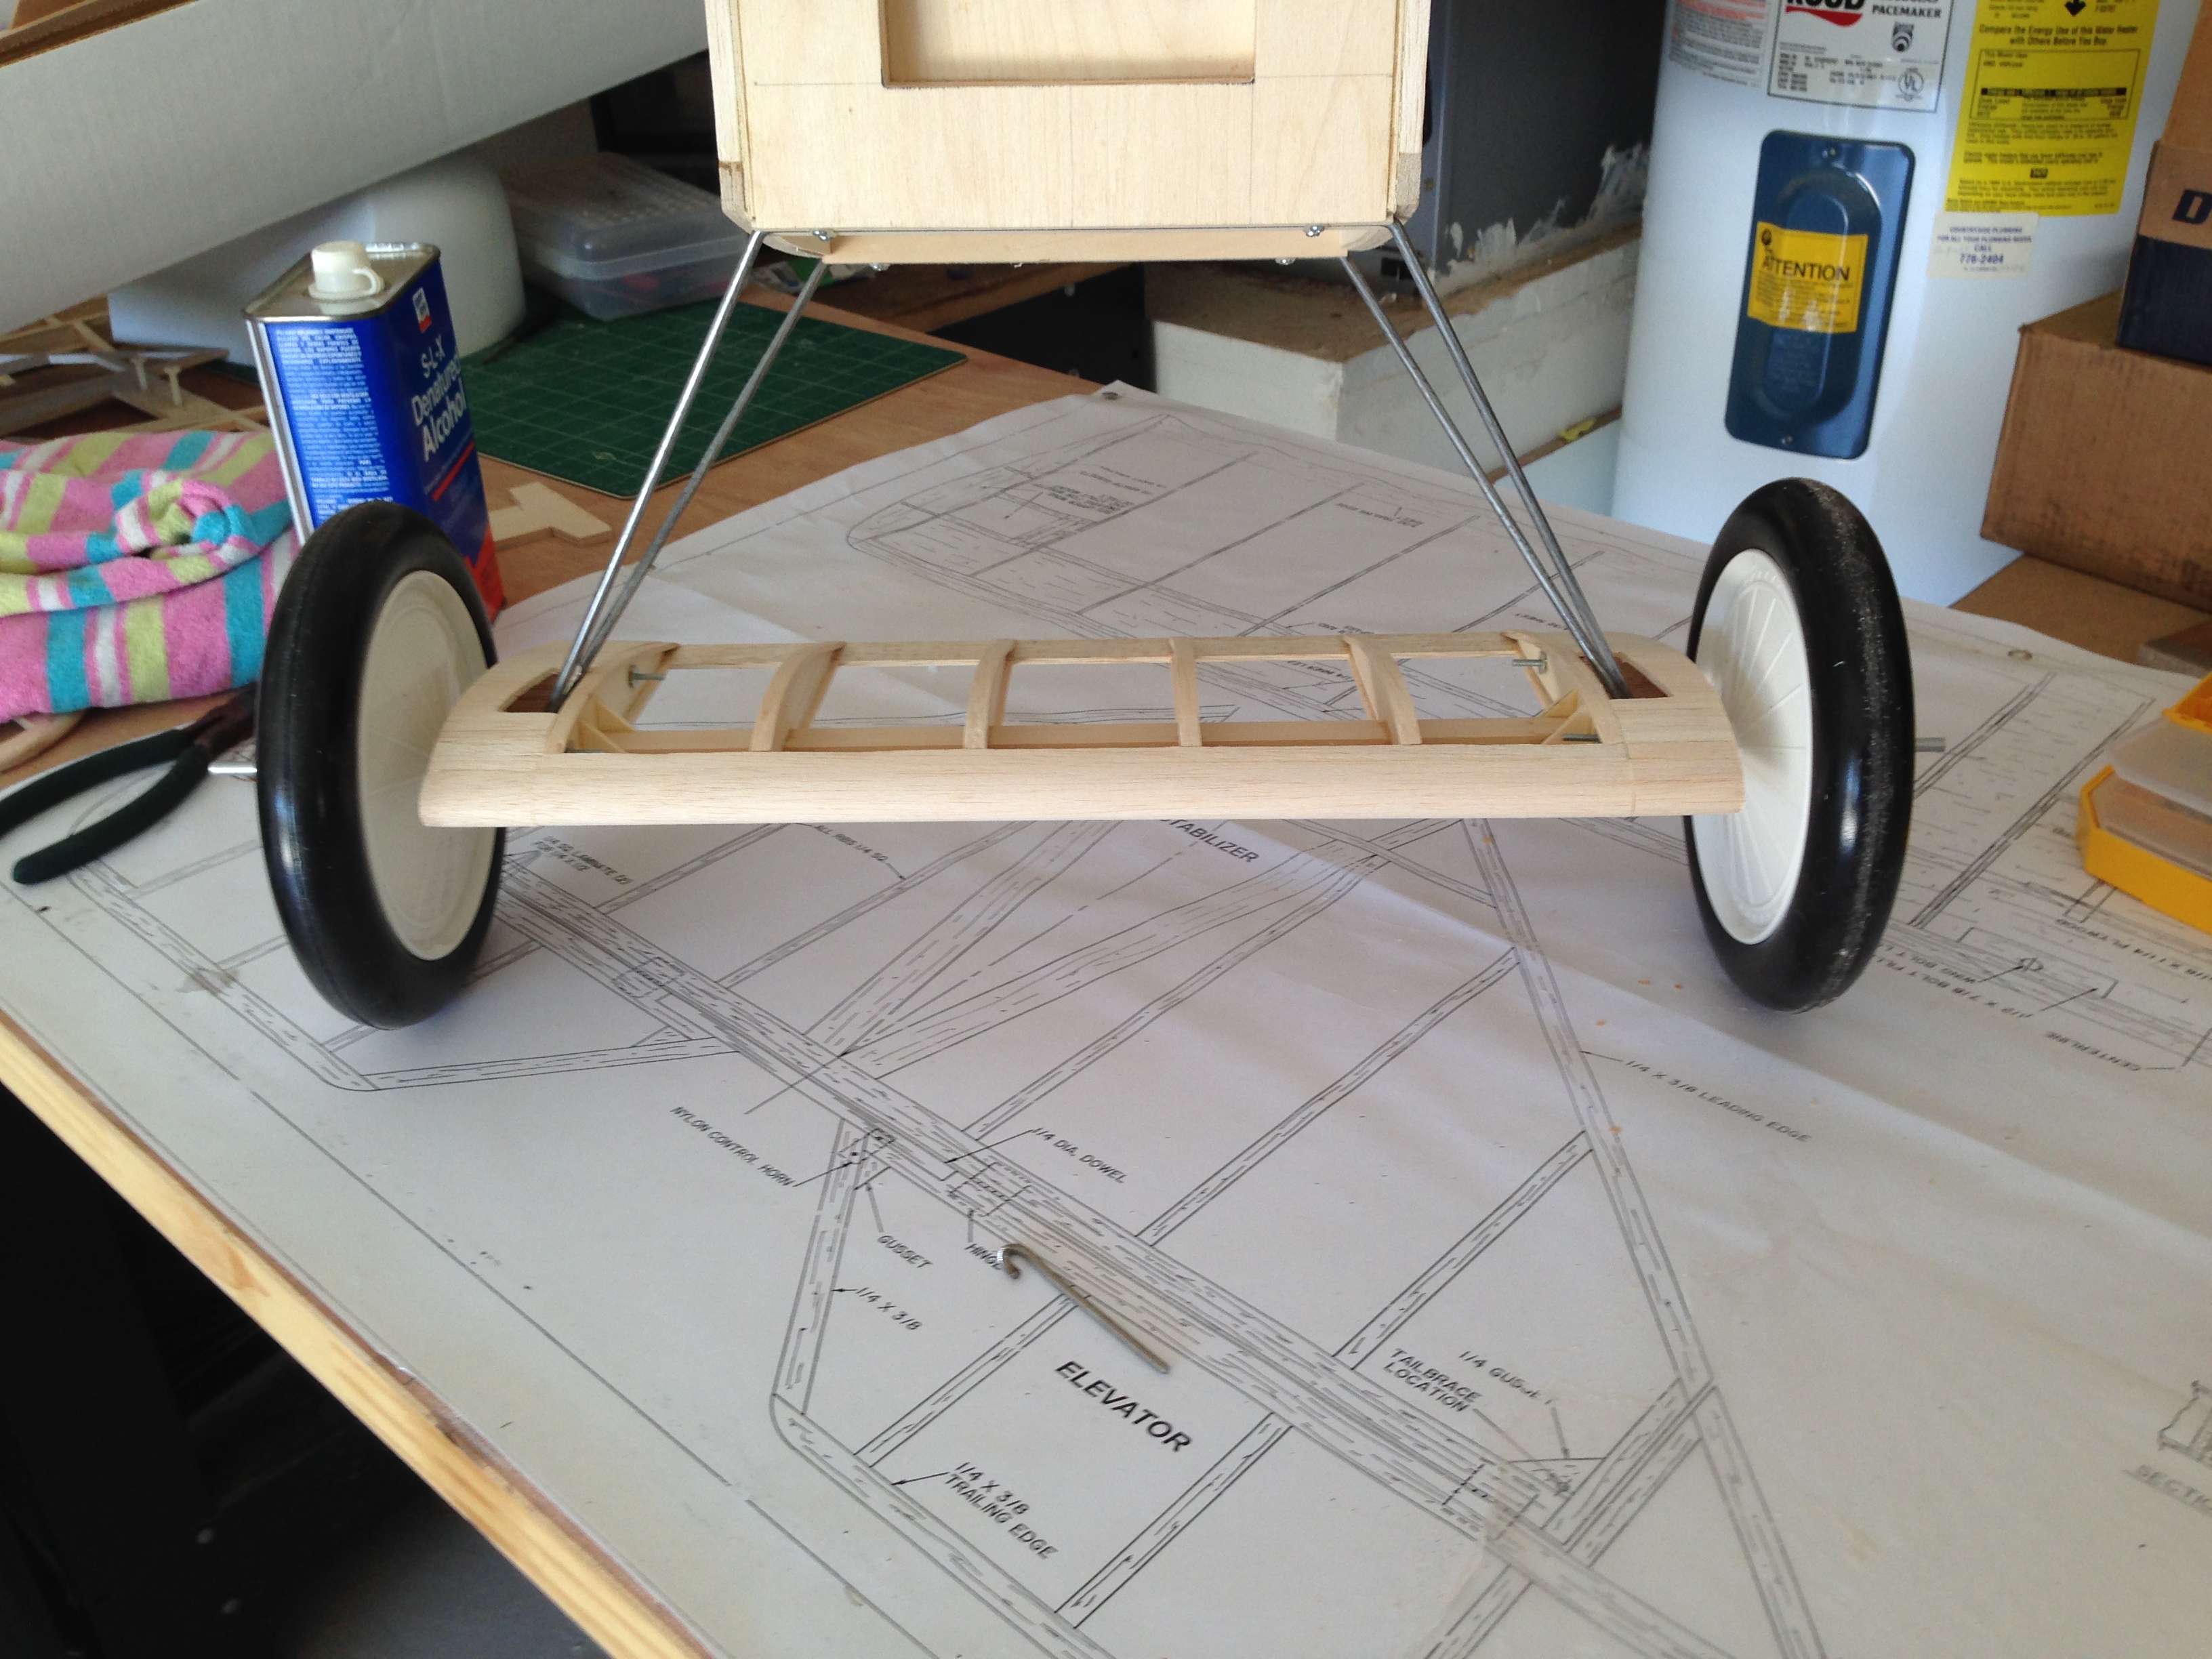
If I have problems, and it sounds like I will, I'll add the brace like VG has done. By the way, yours looks great.
Time for the tail skid. I'm building a more scale looking one that BUSA shows. Funny, anything would be more scale than theirs. I picked up a 1/4 x 2 strip of red oak for it and the wing tip skids. That was about the only hard would I could find at our Home Depot. The wing tip skids are going to be added at this time also. I'm not going very far down the scale road. This is a sport scale plane. I have a lot of time in it this far, can't imagine how much time some guys have in their highly detailed creations.
09-27-2013, 04:10 PM
#129
Thread Starter
My Feedback: (7)
Join Date: Jan 2004
Location: Parrish,
FL
Posts: 206
Likes: 0
Received 0 Likes
on
0 Posts
I've cut my wing tip skids and my tail skid. Don't have the hardware to mount the wing skids, so a trip to the store will be needed. I'm going to make a simple fixed mount for the tail skid. Seems like trying to make it spring loaded or flexing with a bungee is more trouble and weight than it's worth. I will however make the mount removable in case I find out that I am wrong on that last point. Should make the plane easier to cover and paint also.

Ok, I have wanted to add smoke to this plane since I started the build. Looks like there is lots of room in the fuse for a smoke pump and tank. The Sulivan smoke pump weighs only 4 oz. But you need an additional battery, smoke oil tank and a few other bits of hardware. What do you guys think?
Ok, I have wanted to add smoke to this plane since I started the build. Looks like there is lots of room in the fuse for a smoke pump and tank. The Sulivan smoke pump weighs only 4 oz. But you need an additional battery, smoke oil tank and a few other bits of hardware. What do you guys think?
09-27-2013, 04:26 PM
#130
I had smoke in my first DR1 for a small amount of time. I never got it completely sorted out though, before I had engine problems. I had to send my engine in to have it fixed (DLE 30, carb replaced). Then I never got around to putting the smoke back in. I messed with it a lot, and had a hard time getting the density I wanted. Probably needed to move my smoke line inside the muffler a little. The one thing I noticed about smoke, is how messy the oil is. This needs to be considered when you finish. You are basically throwing oil at the airplane. Of course, when the mixture is leaned down (on the smoke oil) it may diminish, but smoke is messy stuff. Something to be aware of.
 10-08-2013, 10:49 AM
#132
Thread Starter
My Feedback: (7)
Join Date: Jan 2004
Location: Parrish,
FL
Posts: 206
Likes: 0
Received 0 Likes
on
0 Posts
Guys, sorry for the lack of updates and progress. I have an IMAC contest this weekend and I seperated the firewall from my Extra last week. I guess lots and lots of flying will do that. That means fix the Extra, not build the Dr 1. Good thing is the Extra is repaired, but I'm keeping in on my building table so that it is as presentable as possible for a bird with a ton of flights on it. As soon as the contest is done, the wife and I are going on a quick vacation, so no building for a couple more weeks. See you then.
10-15-2013, 04:42 PM
#134
Thread Starter
My Feedback: (7)
Join Date: Jan 2004
Location: Parrish,
FL
Posts: 206
Likes: 0
Received 0 Likes
on
0 Posts
I have gotten just a bit of work done on the Dr 1 before the wife and I skip town. My tail skid is nearly complete.

The skid itself is not glued into place yet. I'll save that until after covering and painting. Also, the bracket for the skid is removable. If I find that the skid is not working out and want to change it later...
My wing tip skids are also nearly complete. It kept it pretty simple on these. They are held in place with four brass brackets and I reinforced the outside rib to support the load that the skids my take on a bad landing.


I like the title of the next section in the assembly manual "Final Fuselage Construction."
The skid itself is not glued into place yet. I'll save that until after covering and painting. Also, the bracket for the skid is removable. If I find that the skid is not working out and want to change it later...
My wing tip skids are also nearly complete. It kept it pretty simple on these. They are held in place with four brass brackets and I reinforced the outside rib to support the load that the skids my take on a bad landing.
I like the title of the next section in the assembly manual "Final Fuselage Construction."
10-15-2013, 04:48 PM
#135
What I found funny with this last tripe I built, by the time I got through the entire manual, I was not even halfway done with the build. It is fun to get through the framing, but I made so many changes, It only got me so far. My engine mount took the most time of any single aspect of the build.
Looks great. This has been fun to watch. I just got plans today for a 100" Ziroli Stuka. Just one more project on my list!
Looks great. This has been fun to watch. I just got plans today for a 100" Ziroli Stuka. Just one more project on my list!
10-16-2013, 03:03 AM
#137
Thread Starter
My Feedback: (7)
Join Date: Jan 2004
Location: Parrish,
FL
Posts: 206
Likes: 0
Received 0 Likes
on
0 Posts
Actually, I am planning on doing that. I think VG had posted about his suffering some damage in that area and needed support. I am going to install the pushrods first, so that nothing gets in the way.
10-22-2013, 03:44 PM
#140
Well, I had to insulate, drywall, and paint my garage. Now finally organizing my shop in there as I had to move from the shop space I was renting. Lots of work, and kinda killed the end of this years flying season. I finished the build on my DR1 tripe, got her flown, and then it all came to a stop. I have everything mostly set up now. I threw together a little Alien aircraft "Gadget" bipe, that I put lights in to fly at night. This literally took one week to build. It was a full stick build as well! It was engineered perfectly and was very easy. Especially after all of the big complicated stuff I have been involved in of late.
My list: Finish Sun FLi 5, Joe Bridi pattern plane. This to keep my thumbs sharp with a high performance sport plane.
David Andersen TA 152, 1/5th scale competition model. 118" wing span, G62 for power. About 1/2 way done.
1/5 th scale Ziroli Stuka
1/5th Scale Holman FW190 D9
That is where it sits right now. At least a couple of years worth of work! lol I am so happy to have a triplane again though. One of my favorites for sure. You will love it. Ok, time to get busy! lol
10-24-2013, 04:22 PM
#142
Thread Starter
My Feedback: (7)
Join Date: Jan 2004
Location: Parrish,
FL
Posts: 206
Likes: 0
Received 0 Likes
on
0 Posts
Ok, I know I started this build in June, but yesterday and today (tonight) are the first days that my garage has been a decent temperature for building. If I didn't have to get up for work tomorrow, I'd build all night. This time of year, the weather just gets better and better in Florida. Don't envy me too much, Summer is miserable here.
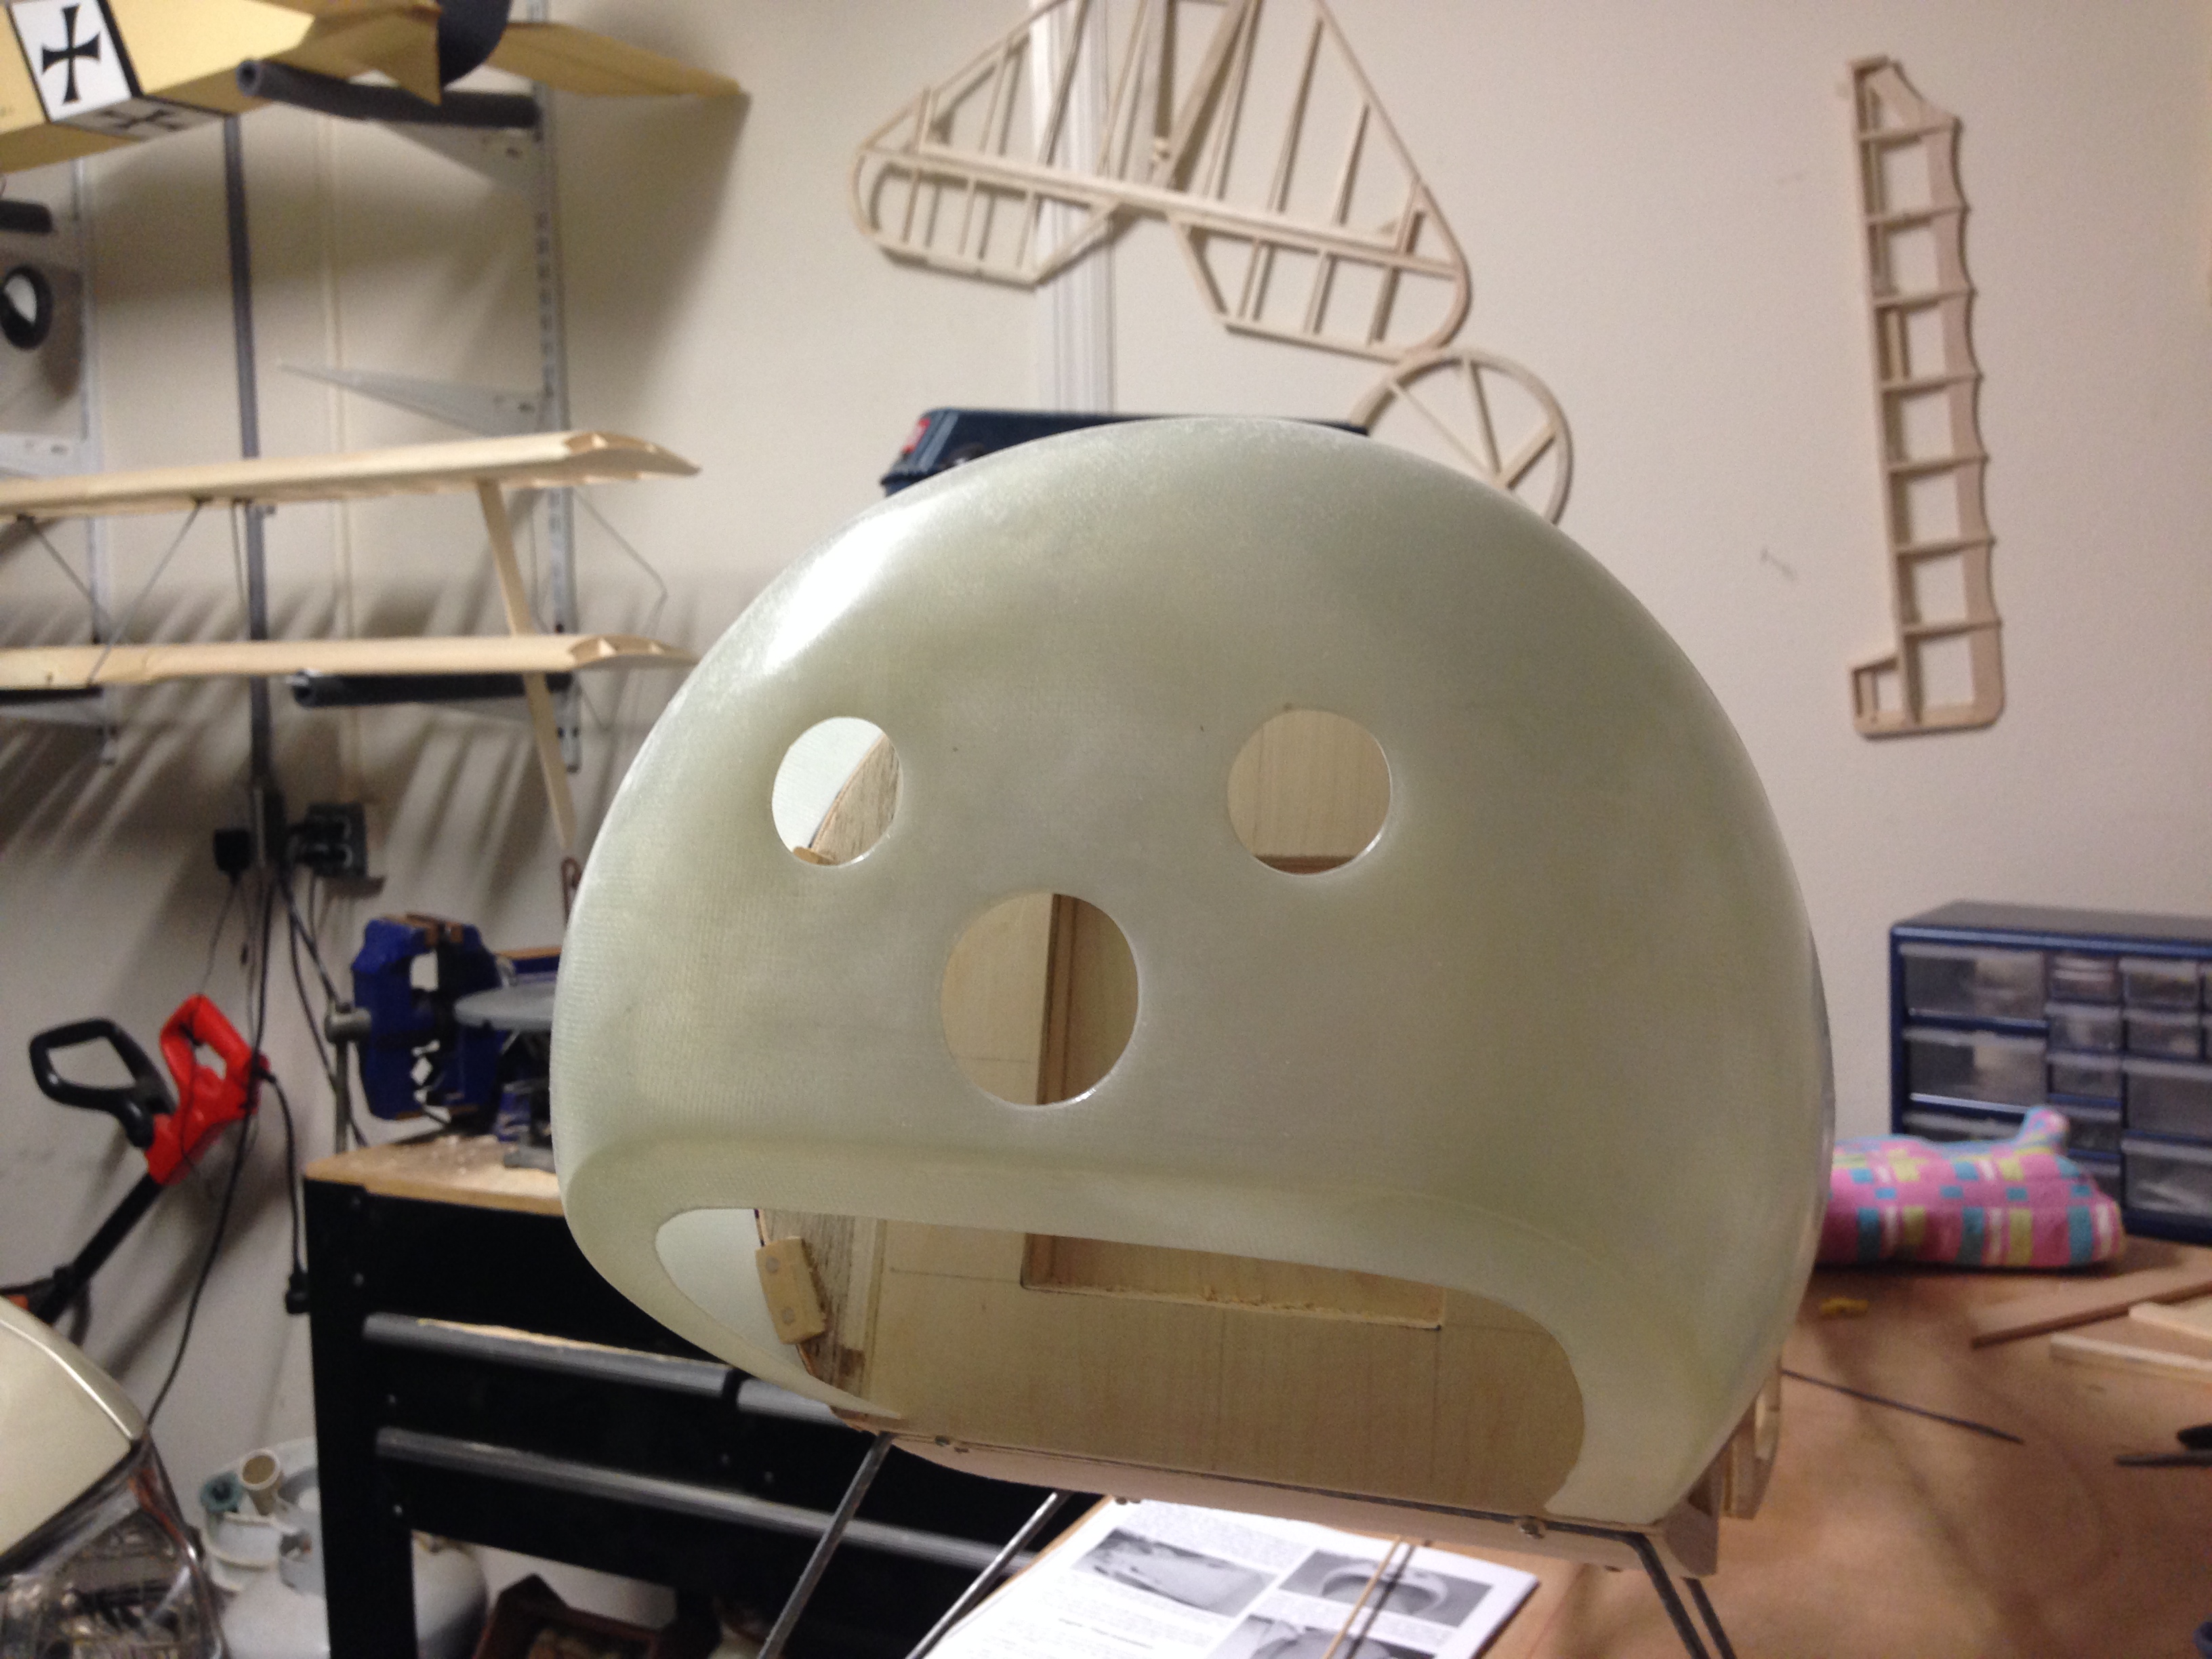
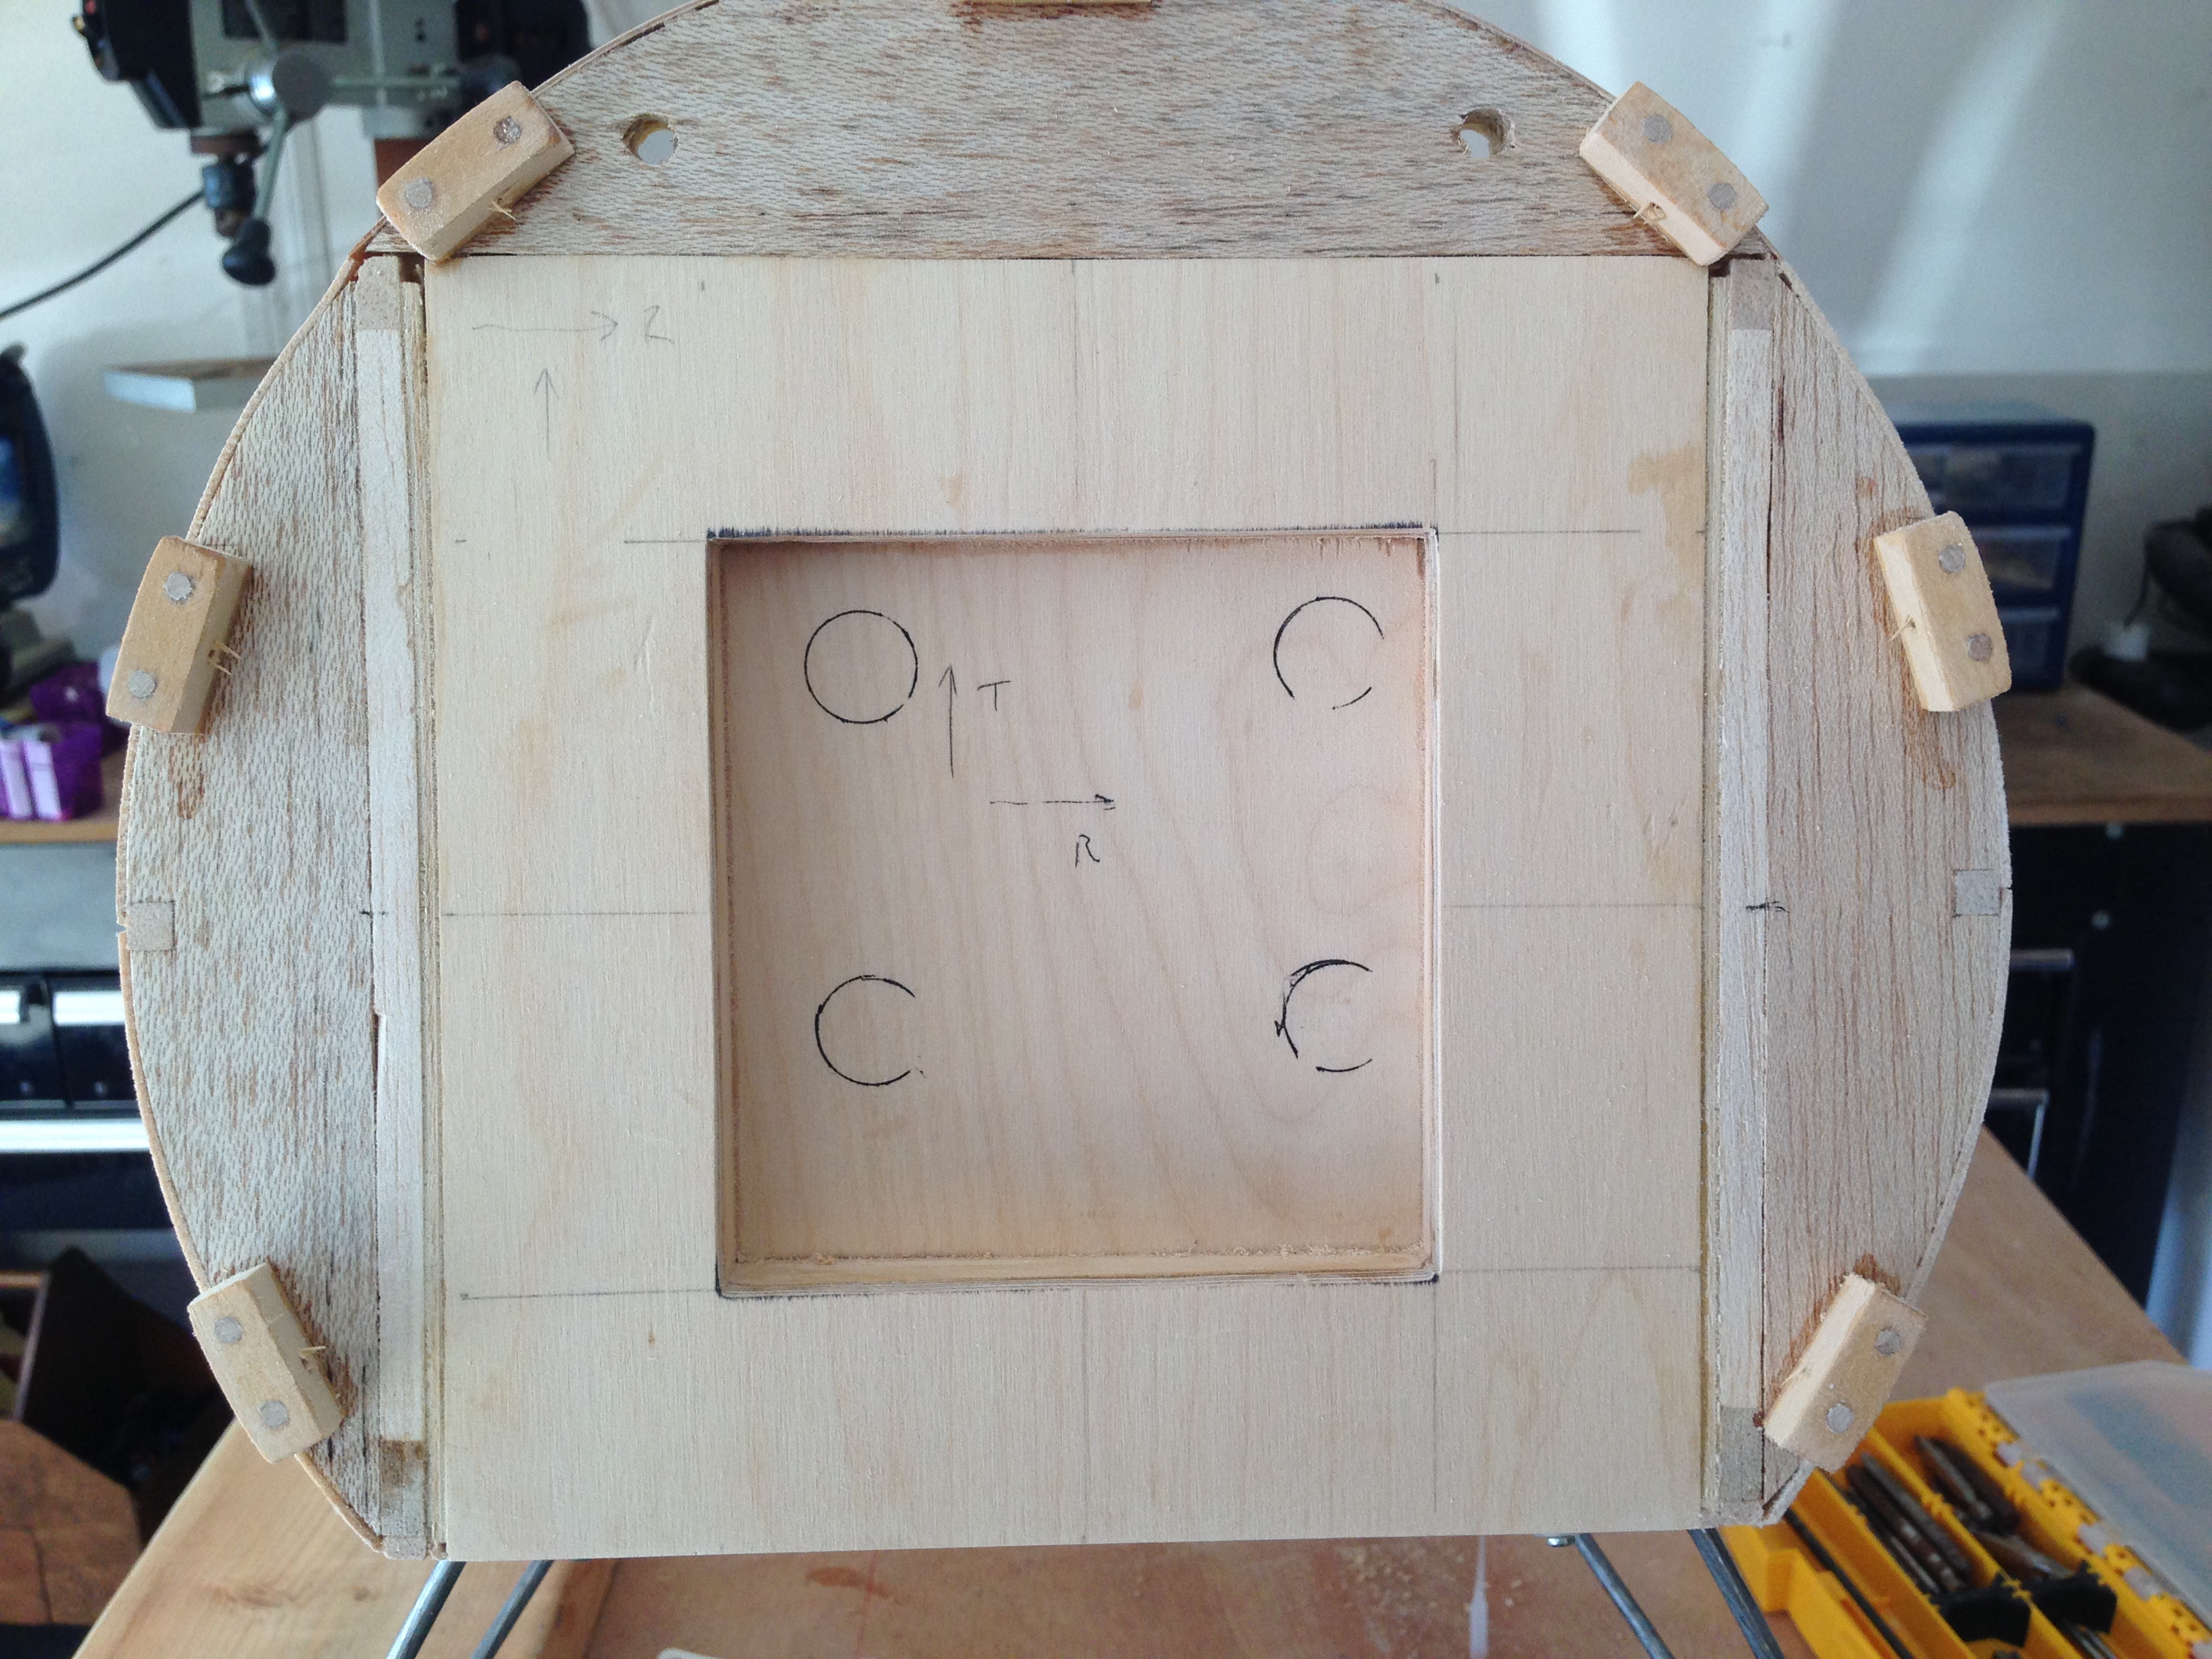
Cowl is mounted. I used seven mounting blocks rather that the five or six shown on the plans. I like to spread the load around as much as possible. Also, I pinned the mounting blocks to the fuse with small dowels. On my Extra, these blocks have come loose even with the dowels. But, I have flown the crap out of the Extra. This plane won't get flown that much, or that hard. IMAA meets are in it's future.

After opening up the prop shaft hole and the cooling holes in the cowl, I got the urge to go with the Steinhauser or Voss paint schemes so that I could put eyes on it.
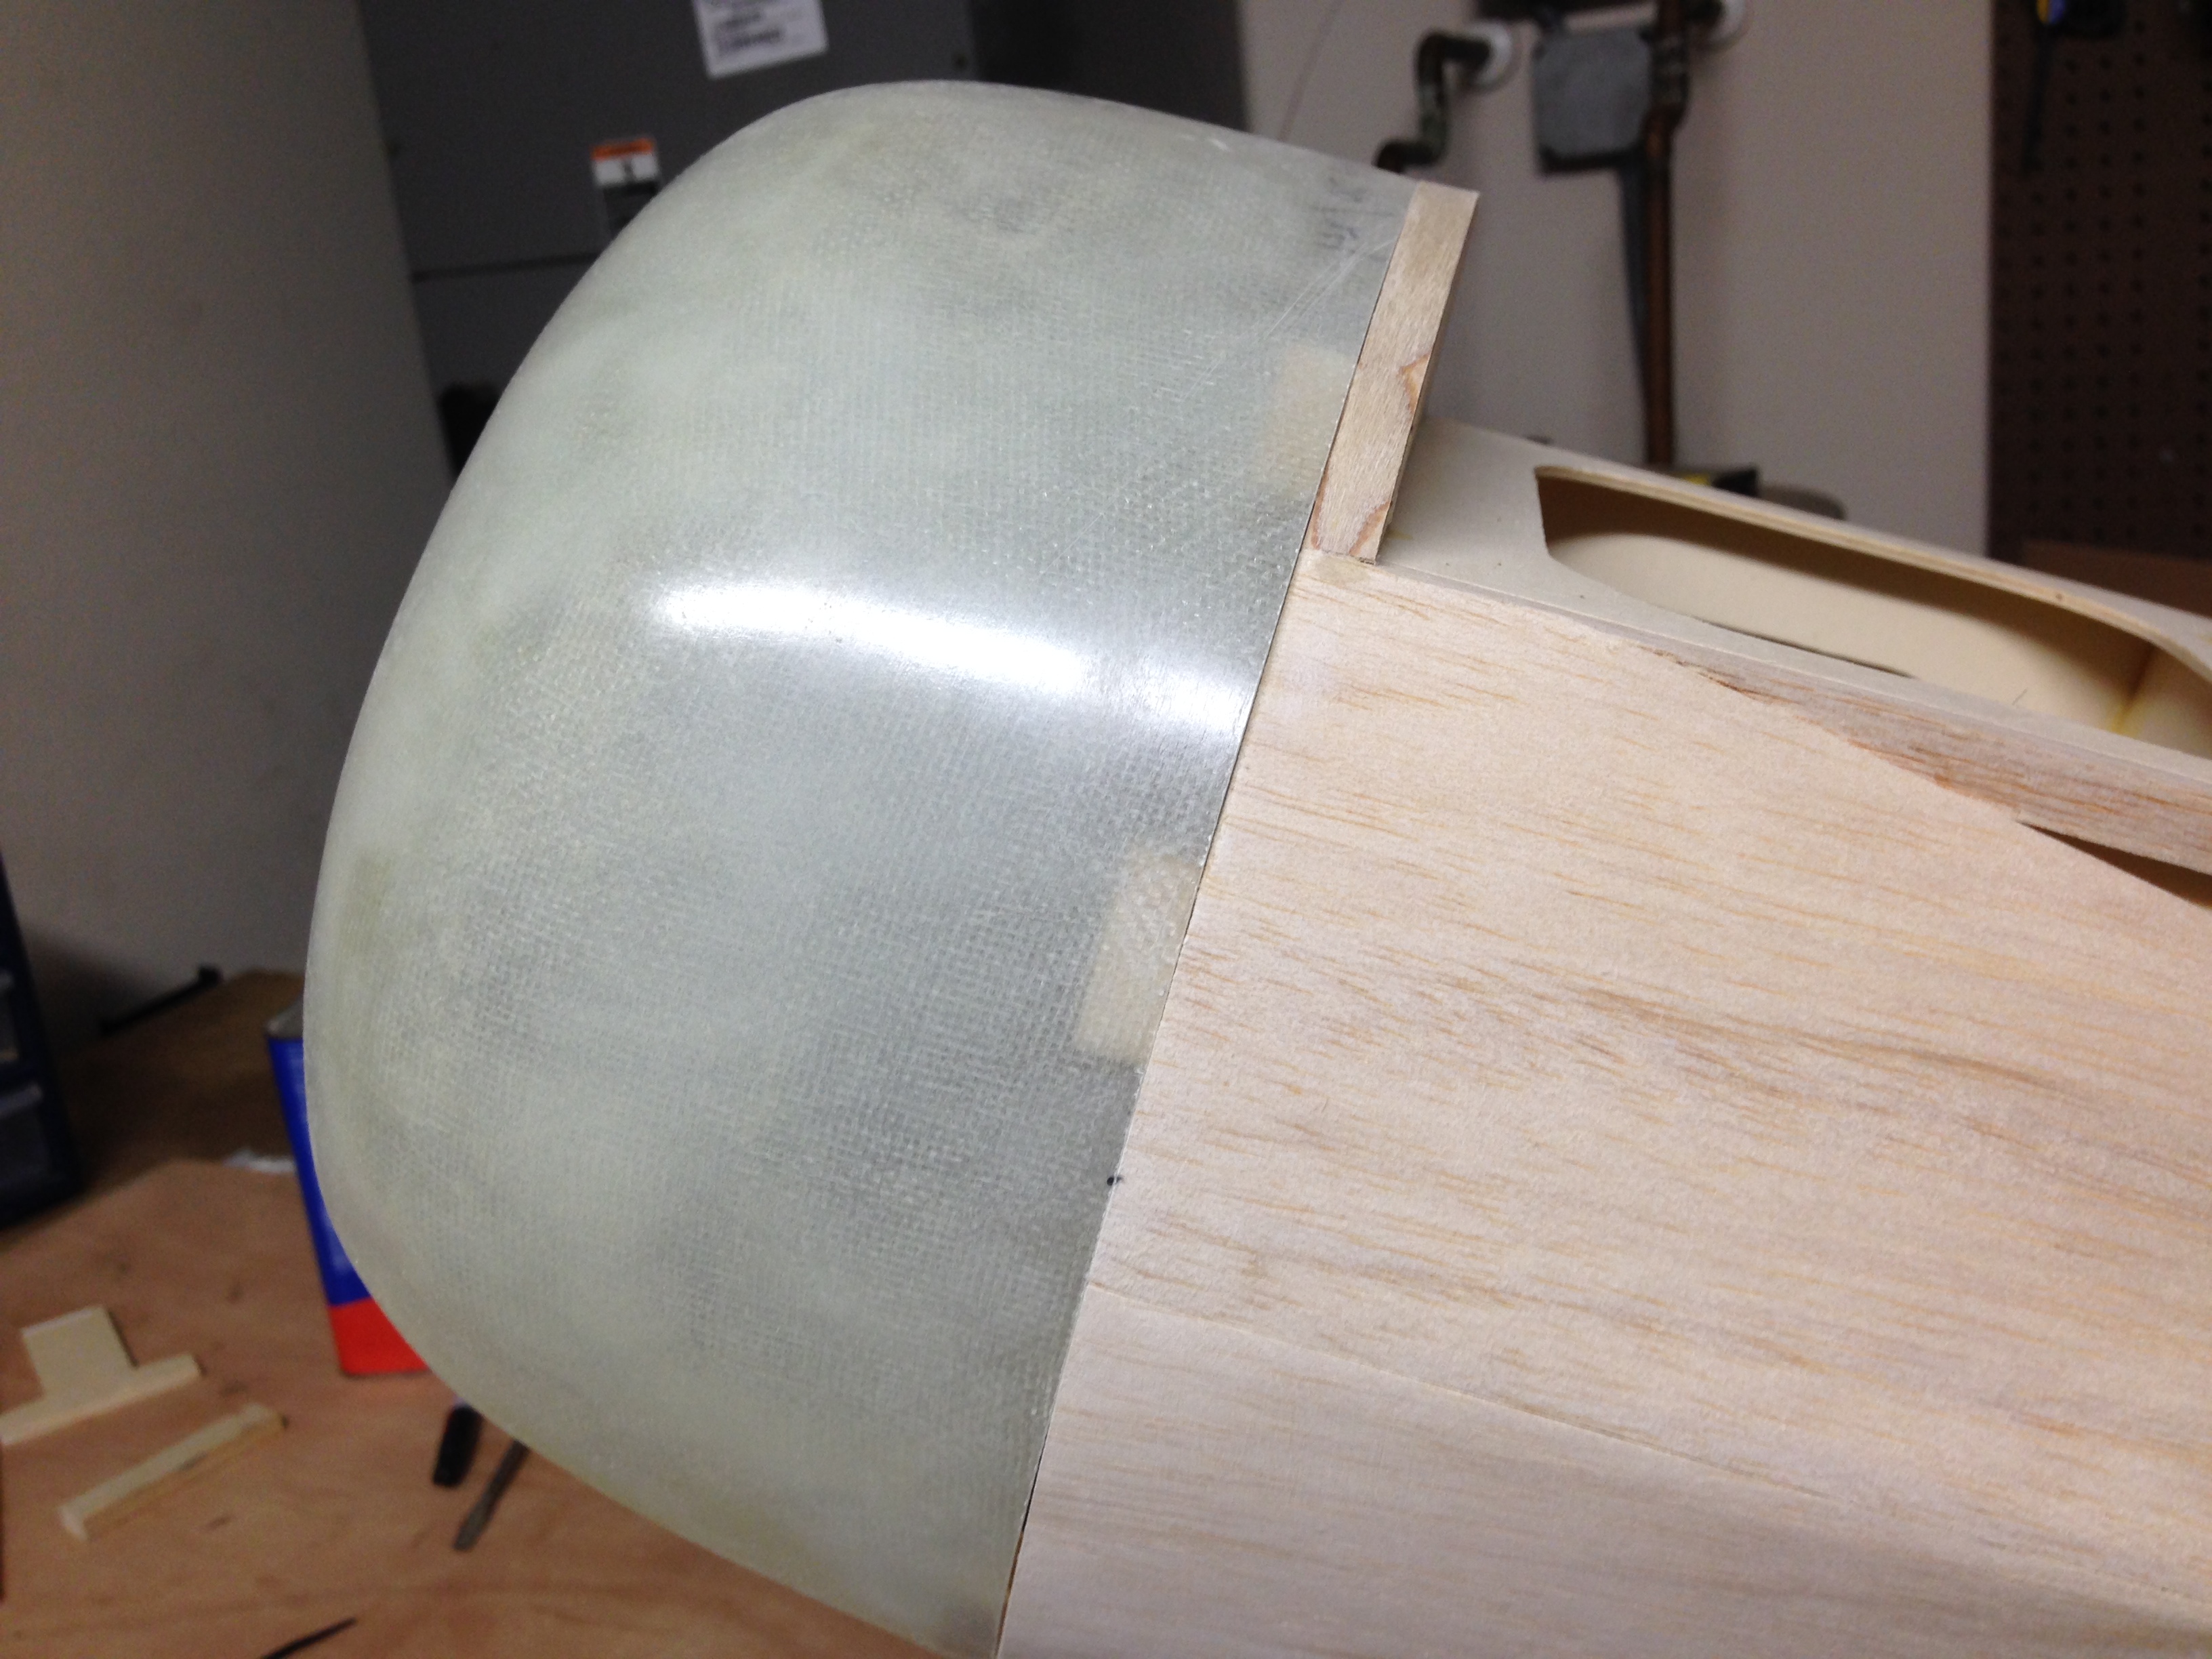
I sanded the cowl to get a nice fit with the fuse.
And did a quick check on the engine mount.
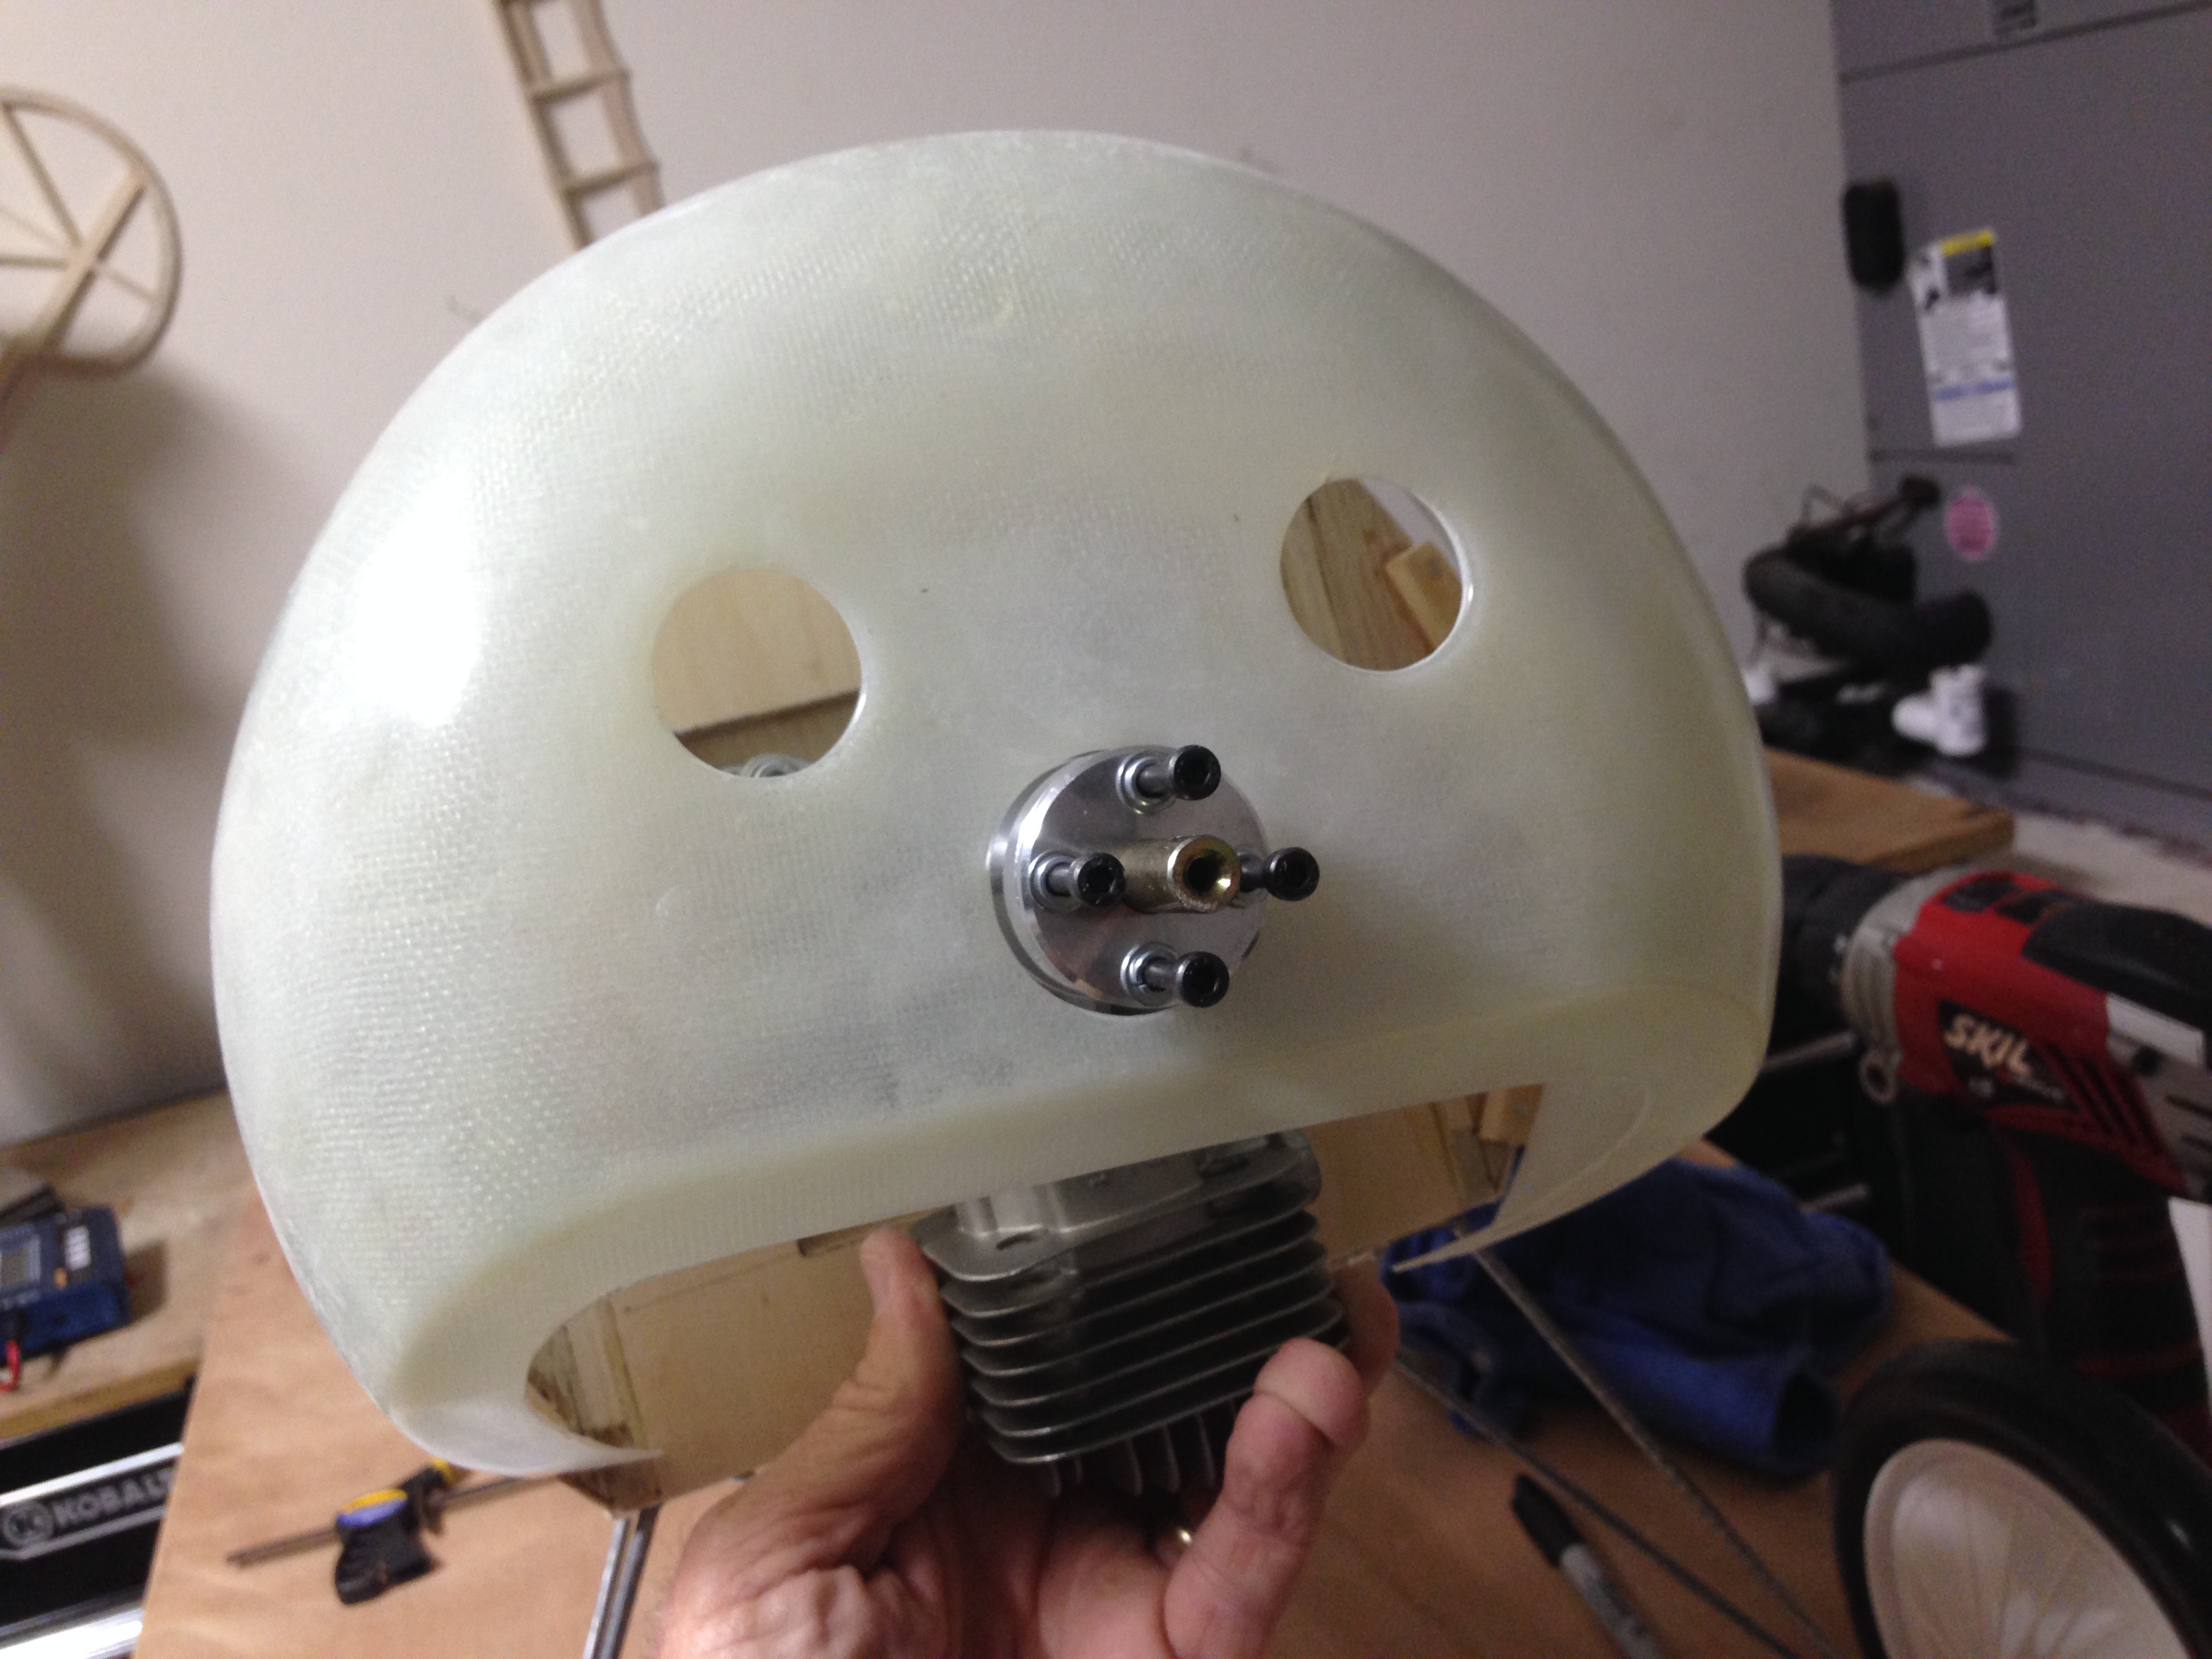
Before drilling and mounting the cowl. The glass cowl made this super easy because I could see through it to the mounting blocks.

Next step is mounting the engine. Should be easy because the right and down thrust was built into my firewall. Just line it up with the prop shaft hole, mark the stand off locations and drill.
Cowl is mounted. I used seven mounting blocks rather that the five or six shown on the plans. I like to spread the load around as much as possible. Also, I pinned the mounting blocks to the fuse with small dowels. On my Extra, these blocks have come loose even with the dowels. But, I have flown the crap out of the Extra. This plane won't get flown that much, or that hard. IMAA meets are in it's future.
After opening up the prop shaft hole and the cooling holes in the cowl, I got the urge to go with the Steinhauser or Voss paint schemes so that I could put eyes on it.
I sanded the cowl to get a nice fit with the fuse.
And did a quick check on the engine mount.
Before drilling and mounting the cowl. The glass cowl made this super easy because I could see through it to the mounting blocks.
Next step is mounting the engine. Should be easy because the right and down thrust was built into my firewall. Just line it up with the prop shaft hole, mark the stand off locations and drill.
10-25-2013, 03:59 PM
#144
Thread Starter
My Feedback: (7)
Join Date: Jan 2004
Location: Parrish,
FL
Posts: 206
Likes: 0
Received 0 Likes
on
0 Posts
Ok, the motor is mounted. It was just about as easy as I expected.
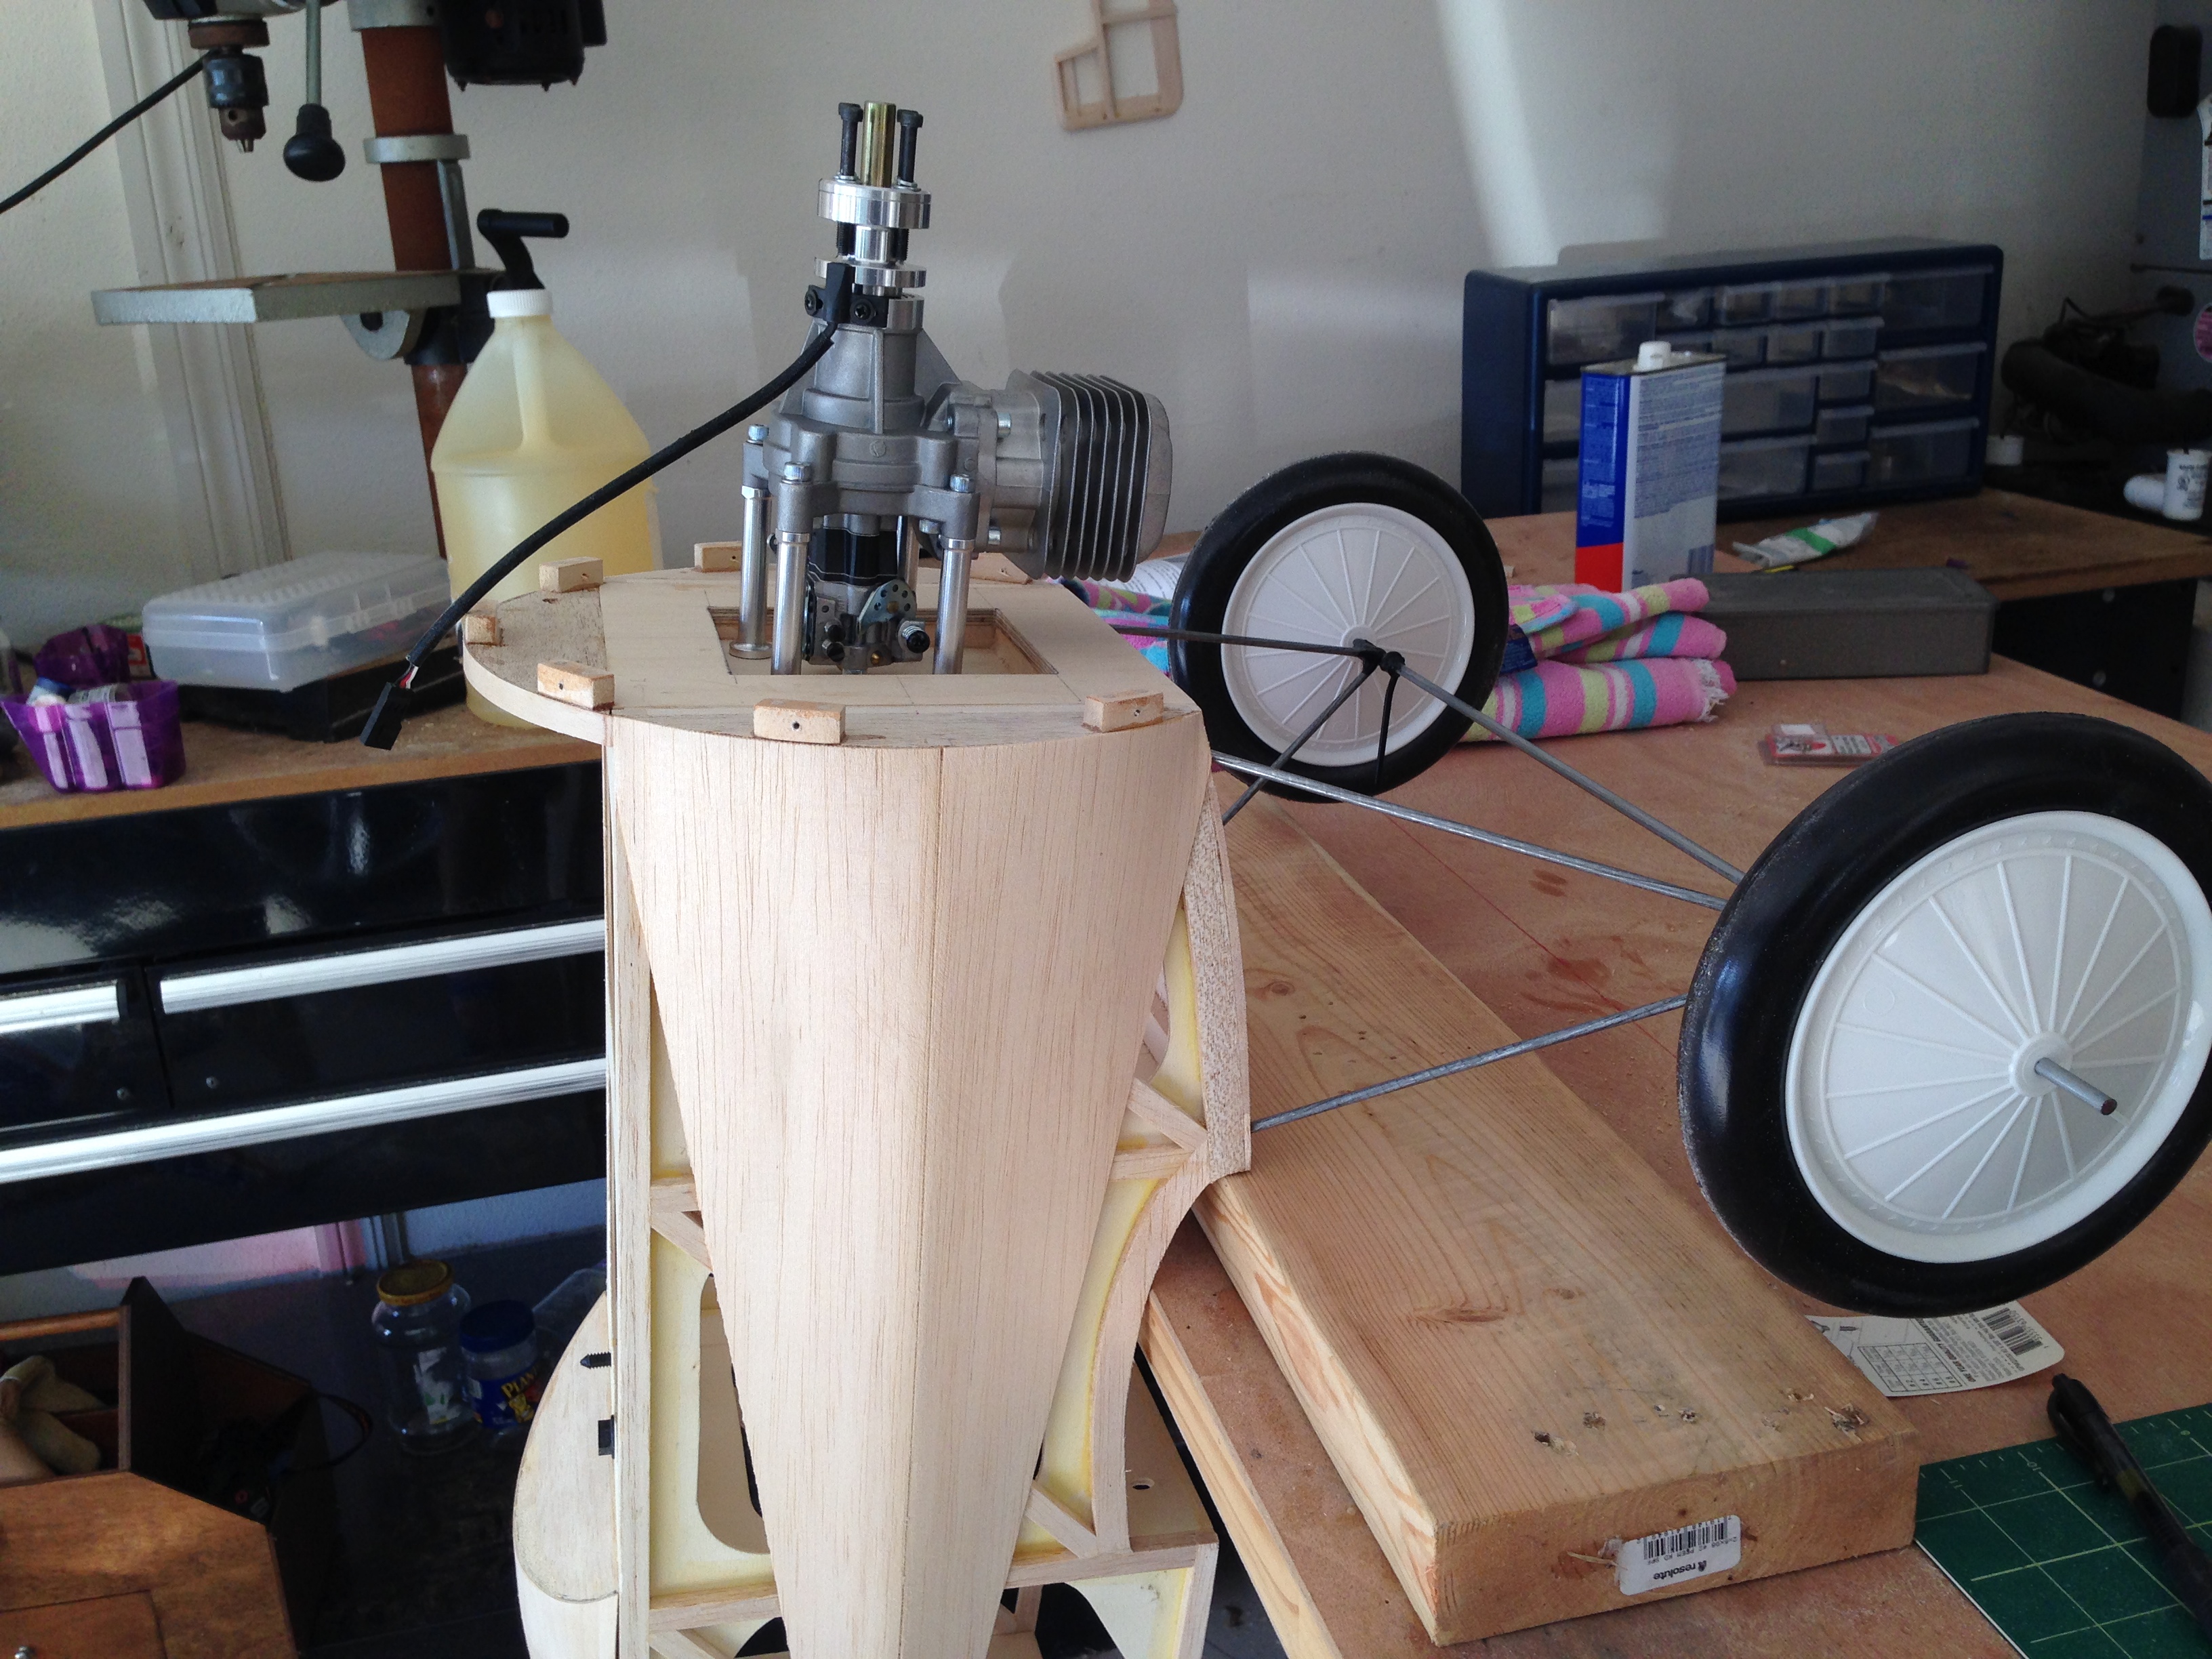
I've blocked up the fuse so that it is nearly vertical and the engine will rest in place.

The cowl is fitted to the fuse and the engine centered in the cowl. Then the cowl is carefully removed and the standoffs are marked on the firewall.
Holes are drilled for the standoffs and the engine bolts right on.


Here is the moment of truth. I couldn't help but drill my WWI prop and play with it a bit.

I also managed to get started on the strut fairings. I thought they were going to be trouble, but it does not appear that way. BUSA says to cover them with the same material the airframe is covered with, but I'm gonna wrap them in glass cloth and resin. After sanding, the should look real nice.

I've blocked up the fuse so that it is nearly vertical and the engine will rest in place.
The cowl is fitted to the fuse and the engine centered in the cowl. Then the cowl is carefully removed and the standoffs are marked on the firewall.
Holes are drilled for the standoffs and the engine bolts right on.
Here is the moment of truth. I couldn't help but drill my WWI prop and play with it a bit.
I also managed to get started on the strut fairings. I thought they were going to be trouble, but it does not appear that way. BUSA says to cover them with the same material the airframe is covered with, but I'm gonna wrap them in glass cloth and resin. After sanding, the should look real nice.
10-25-2013, 04:09 PM
#145
Looking awesome! Yep, the struts are not tough, but they seem to take forever to cover. Your method may go faster, but all of those little bits on these WW1 aircraft seem to add up to a lot of work. That 30 will be a great engine for your tripe.
Which color scheme were you gonna do again?
Which color scheme were you gonna do again?
10-25-2013, 04:22 PM
#146
Thread Starter
My Feedback: (7)
Join Date: Jan 2004
Location: Parrish,
FL
Posts: 206
Likes: 0
Received 0 Likes
on
0 Posts
I'm doing the Lothar von Richtofen color scheme. But I'm taking a few liberties. Lothar was shot down mid-March 1918, and probably did not fly the Dr 1 with the balkenkreuz markings. But, because I like it (and it's going to be easier to paint) that's the way I'm painting it.
10-25-2013, 04:48 PM
#147
I'm doing the Lothar von Richtofen color scheme. But I'm taking a few liberties. Lothar was shot down mid-March 1918, and probably did not fly the Dr 1 with the balkenkreuz markings. But, because I like it (and it's going to be easier to paint) that's the way I'm painting it.
10-26-2013, 04:11 PM
#148
Thread Starter
My Feedback: (7)
Join Date: Jan 2004
Location: Parrish,
FL
Posts: 206
Likes: 0
Received 0 Likes
on
0 Posts
Firstly, VG, great looking DVII. Second, you are correct about the amount of time the strut fairings take. And, those things are fragile. But, I've gotten the landing gear fairings cut, sanded and glued. Started on the cabane strut and maybe they will be glued tomorrow. I plan on getting everything glued in place and glassing the bunch at one time.

Since you mentioned painting the Maltese crosses, this is what I did last time. I made a pattern out of ply and used it to cut sticky paper. I like the idea of painting them with a brush, but I tried that on the Solartex last time with poor results. Rattle cans for me. Now, I will be painting olive over Solartex with a brush, but that's supposed to look streaky. Should come naturally to me.

Since you mentioned painting the Maltese crosses, this is what I did last time. I made a pattern out of ply and used it to cut sticky paper. I like the idea of painting them with a brush, but I tried that on the Solartex last time with poor results. Rattle cans for me. Now, I will be painting olive over Solartex with a brush, but that's supposed to look streaky. Should come naturally to me.
