


Introducing the Top RC Model Odyssey - New sport jet - build thread
 12-12-2018, 04:47 AM
#376

Join Date: May 2014
Posts: 344
Likes: 0
Received 0 Likes
on
0 Posts
stock gear.. added 6 ounces in left wing to match right one's weight, no smoke system and mine is the white sport scheme as the original one made.
i think some will have more weight due to paint and epoxy layup over uses
i think some will have more weight due to paint and epoxy layup over uses
 12-12-2018, 06:11 AM
#377

My Feedback: (1)
Join Date: Apr 2011
Location: Batavia, OH
Posts: 39
Likes: 0
Received 0 Likes
on
0 Posts
I have the red/black scheme. I guess I shouldn't worry about it, the turbine I have should compensate just fine. I will still be greater than 1:1 on thrust to weight .
Like you, I need to just go fly it. Getting anxious.
I do have a smoke pump and tank for it, but I'm adding that after I fly so I can tell where I should place the pump for best balance. Thanks for your input.
12-13-2018, 10:13 AM
#378
I imagine that will work, it should be a big help putting them in the nose. Yea I put my uat up front when I read other were adding some weight, hoping not to.
I am hoping I can remove my weight after first flight. If not, it is what it is, but I would really like to remove the extra weight.
I have 3 - 2S-5000mah lipos, and 1 3S-3800mah life. Not going to add any bigger here, just added a little weight each side under the batteries.
Not only that, but now mine weights 33.9 lbs. well over the expected weight, disappointing. Was hoping for a light jet around 24-28lbs like advertised. I just keep hoping it flys well.
thats A LOT of battery capacity!
are you certain you are checking CG correctly? sounds like it might be off.
12-13-2018, 05:01 PM
#379
My Feedback: (1)
Join Date: Apr 2011
Location: Batavia, OH
Posts: 39
Likes: 0
Received 0 Likes
on
0 Posts
Yea lots of battery. Never use it all. Turbine battery only one I need to watch. I got the batts on sale so I bought them and thinking that would be enough weight for balance.
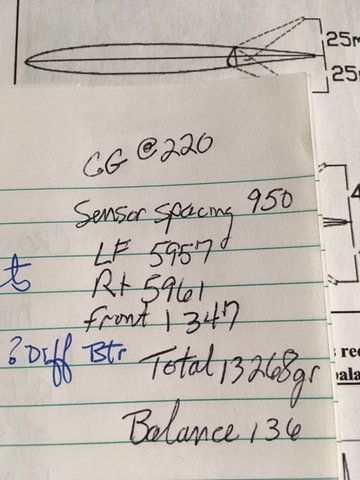
Well I am checking CG with my new Xicoy CG setup with the 3 scales. That�s how I know the weight. I�m going to triple check maybe this weekend but keeps coming out same.
Well I am checking CG with my new Xicoy CG setup with the 3 scales. That�s how I know the weight. I�m going to triple check maybe this weekend but keeps coming out same.
12-14-2018, 03:58 AM
#380
My Feedback: (1)
Join Date: Apr 2011
Location: Batavia, OH
Posts: 39
Likes: 0
Received 0 Likes
on
0 Posts
It is the first time I have used the machine for CG, but seems pretty straight forward.
How bout horsefeetky, any chance you can share what numbers you entered into your CG machine for comparison ?
Maybe there is something in the tail structure of my jet adding weight and maybe that is why it comes out heavier than others. I agree it does seem to be alot of battery in the nose on each side of the gear, and still added weight.
I may try and see if I can lift it up at the CG point by hand, but was not sure if that would be hard on the wings lifting the jet in a single point of balance. What do you think about doing this ?
Just my luck to get a heavy jet I guess.
Last edited by RP-Stinger; 12-14-2018 at 04:01 AM.
 12-14-2018, 05:07 AM
#382
Join Date: May 2014
Posts: 344
Likes: 0
Received 0 Likes
on
0 Posts
and yes you can do the old school method of balance. i suggest using two short blocks of 2x4 drilled in the center of the wider side to accept a wood dowel each with a small sticker of soft velcro on top. i use a 1/2 inch dowel on large planes with the outer edge of the top of the dowel sanded a tad so as not to damage the plane. place at the cg on the root of the wing.. be at the root this is strong and will not hurt the wing. measure your height of dowel so you get about 1" lift off the table when using it. that way you can retract gear if you wish. i balanced this jet with gear down knowing it wont move much when retracted.
let me know if my numbers sound similar to yours
let me know if my numbers sound similar to yours
12-14-2018, 05:39 AM
#383
My Feedback: (1)
Join Date: Apr 2011
Location: Batavia, OH
Posts: 39
Likes: 0
Received 0 Likes
on
0 Posts
and yes you can do the old school method of balance. i suggest using two short blocks of 2x4 drilled in the center of the wider side to accept a wood dowel each with a small sticker of soft velcro on top. i use a 1/2 inch dowel on large planes with the outer edge of the top of the dowel sanded a tad so as not to damage the plane. place at the cg on the root of the wing.. be at the root this is strong and will not hurt the wing. measure your height of dowel so you get about 1" lift off the table when using it. that way you can retract gear if you wish. i balanced this jet with gear down knowing it wont move much when retracted.
let me know if my numbers sound similar to yours
let me know if my numbers sound similar to yours
I am going to try both methods again later this afternoon/eve just to satisfy myself. I will post my findings from both ways. Thanks
12-14-2018, 01:15 PM
#384
Thanks for the info, and yes those numbers sound like what I had and was using. I like the dowels in the 2x4, that can be handy. I also have done similar old school setups for my giant planes, just wasn't sure about the strength on the jet wing. Makes since on staying up by the root.
I am going to try both methods again later this afternoon/eve just to satisfy myself. I will post my findings from both ways. Thanks
I am going to try both methods again later this afternoon/eve just to satisfy myself. I will post my findings from both ways. Thanks
Good luck!
12-14-2018, 01:20 PM
#385
when using electronic CG machine/scales keep in mind that you have to make the aircraft flight level while sitting on the scales. It is assumed we all know this but you always see demonstrations where people just sit the aircraft on the scales and start balancing. when I first received my CG machine/scales we set a jet on there that was already flying well just to see where the CG machine would compare to the mechanical CG machine the jet was originally set up on. We put the jet on the electronic CG machine and it showed the jet to be tail heavy and we added over a pound of weight to the nose section to make the plane CG on the electronic machine. When we put the airframe on the mechanical CG machine it was extremely nose heavy. We were scratching our heads??? through some post on RCU we were told to make the aircraft flight level (we stuck some magazines under the scales for the mains) and magic happened. So now we make the aircraft flight level first before adding/subtracting weight or moving things around. The other thing we do because some aircraft will squat on their main gear struts, we use zip ties to stop the struts from squatting. I thought I would just mention it just in case because I don't want to assume you already knew. Some manufacturers and fellow modelers think certain things don't have to be mentioned because they assume we should already know. I tell people to talk to me as I know nothing because I don't know a lot of things when it comes to this hobby on this level. So far we have only had one aircraft that sat on it gear flight level and did not require adding something under the scales to level it.
Good luck!
Good luck!
what is your definition of flight level? zero wing incidence?
12-14-2018, 03:01 PM
#386
My Feedback: (1)
Join Date: Apr 2011
Location: Batavia, OH
Posts: 39
Likes: 0
Received 0 Likes
on
0 Posts
Thanks pcskyhi, for the good tips also. I actually did not think about the zip ties on the gear, that is a great idea, because the gear can squat different on each side.
I did know about make the jet level, ground level I'll call it. I used levels and made sure all the scales were level with each other, then used the zip ties as well.
My model still checks out all the measurements the same as I had before. I even check using the lift method under the wings to balance and verify the CG matched my machine, and it did match.
Everything is checking out just at is should. After checking 3 times I am confident it will fly great.
I did remove 6oz of my nose weight and this sets my CG at the 220 mark which I believe I will be happy with it there. (Still have to leave 6oz in the nose with my batteries.)
That means my jet now weighs out at 33.5 lb. or 15.2 kg. So I am ready to fire up the turbine and can't wait to put this sweet looking jet in the air.
Thanks for everyone's help and information here. Makes me feel good my jet is ready. I'll be checking in later and for sure, after the maiden, let you all know how it goes.
12-14-2018, 03:16 PM
#387
Some say they use zero incidence as you mentioned, others say they just eyeball it but I personally use a bubble level on the CG point and that has worked for me. I think the eyeball thing is the most popular method. I no expert on this so hopefully someone else can jump in.
12-14-2018, 05:19 PM
#388
Join Date: May 2014
Posts: 344
Likes: 0
Received 0 Likes
on
0 Posts
also take note on my rtf dry weight im using a swiwin 140b that is pretty light no pilot either. so im doing all i can to keep this jet light for everyday sport flying next year. i will dbl check all sunday when i assemble it again to setup the gyro and run the turbine. then its going away with lipo's in storage mode until spring calls with good weather.
12-15-2018, 05:55 AM
#389
My Feedback: (1)
Join Date: Apr 2011
Location: Batavia, OH
Posts: 39
Likes: 0
Received 0 Likes
on
0 Posts
also take note on my rtf dry weight im using a swiwin 140b that is pretty light no pilot either. so im doing all i can to keep this jet light for everyday sport flying next year. i will dbl check all sunday when i assemble it again to setup the gyro and run the turbine. then its going away with lipo's in storage mode until spring calls with good weather.
I considered a 140 that most people are using but checking with Kingtech I like, the 140 and 160 had the same weight so ...
Also, I am using a pilot, not sure what he weights, never checked. Just wanted one in there for now.
So some of my additional weight is starting to make sense, thanks for the info, I am feeling that I am right on track with mine and what I have in it.
You should have a great flying light sport jet. Nice. Hope to see it this spring.
I have my gyro and all settings already programmed and ready for flight. All I need to do is run the thing and check for leaks, taxi checks, and I am ready to rotate.
I am not sure I can wait till Spring. LOL But we shall see, if or when we get a decent warm day again before spring, I might have to wait.
12-15-2018, 11:14 AM
#391
Join Date: May 2014
Posts: 344
Likes: 0
Received 0 Likes
on
0 Posts
just put mine on the bench again toady and leveled the wing to zero incidence and it did move my cg a tad forward it is now a solid 215mm from le
i am going with that for maiden and can move a small brake battery pack later if i want it closer to 220mm
now off to program the as3000 gyro and setup the final throws on the radio going to try and mix a crow in the full flap position also..
i am going with that for maiden and can move a small brake battery pack later if i want it closer to 220mm
now off to program the as3000 gyro and setup the final throws on the radio going to try and mix a crow in the full flap position also..
12-15-2018, 03:42 PM
#393
My Feedback: (1)
Join Date: Apr 2011
Location: Batavia, OH
Posts: 39
Likes: 0
Received 0 Likes
on
0 Posts
just put mine on the bench again toady and leveled the wing to zero incidence and it did move my cg a tad forward it is now a solid 215mm from le
i am going with that for maiden and can move a small brake battery pack later if i want it closer to 220mm
now off to program the as3000 gyro and setup the final throws on the radio going to try and mix a crow in the full flap position also..
i am going with that for maiden and can move a small brake battery pack later if i want it closer to 220mm
now off to program the as3000 gyro and setup the final throws on the radio going to try and mix a crow in the full flap position also..
I also setup the crow to try on mine, Using the throws from i3dm post. Thanks i3dm, so much help here, it is appreciated.
I did put the crow on a separate switch so if I go to full flaps and I am not happy with it at first I can switch off the crow part.
But it sounds like it is a nice plus.
12-15-2018, 06:13 PM
#394
Join Date: May 2014
Posts: 344
Likes: 0
Received 0 Likes
on
0 Posts
got the full gyro settings done now just a run up of turbine tomorrow afternoon and im ready to placebatteries in sotrage mode for winter.. been doing dbl time as im setting up a predator with k180 in it at the same time. yes twice the fun......just need to swap a fuel and vent line on that one and its at the same point ready for a run up...... going to be a fun year next year.
12-16-2018, 06:07 AM
#395
My Feedback: (1)
Join Date: Apr 2011
Location: Batavia, OH
Posts: 39
Likes: 0
Received 0 Likes
on
0 Posts
Nice. That is awesome on building two.
Sounds like we had similar ideas.
I too was considering the Predator before I found the Odyssey. Can only build one at a time here, I liked the look of the Odyssey more so than the Predator. Not sure what my next one will be now. Still have my F16 to fly for now. See what new stuff comes out next year.
Sounds like your going to have so much fun next year.
Thats great 👍
12-16-2018, 06:24 AM
#396
Join Date: May 2014
Posts: 344
Likes: 0
Received 0 Likes
on
0 Posts
i was surprised to find the predator weigh in at 30 1/2 pounds with k180g in it.. the jet feels so much thicker in glass and overall i found it to give me the impression the ody would be much lighter when in same state rtf dry.. i do know the predator is built a touch stronger in most every way but the ody is for sure a fine plane. the ody has a better finish on it. the predator shows a lot of blems through the paint. i have bubbles and seam lines where ducting and such are molded on to fuse.
12-16-2018, 06:48 AM
#397
My Feedback: (1)
Join Date: Apr 2011
Location: Batavia, OH
Posts: 39
Likes: 0
Received 0 Likes
on
0 Posts
Yea nice weight for the predator with the K180. Should be pretty fast I imagine. 👍
Bummer on the finish. Hopefully not to noticeable.
I do love the finish on my Odyssey. It�s very nice.
Bummer on the finish. Hopefully not to noticeable.
I do love the finish on my Odyssey. It�s very nice.
12-16-2018, 04:38 PM
#398
Join Date: May 2014
Posts: 344
Likes: 0
Received 0 Likes
on
0 Posts
just ran the swiwin 140b it is a beast.. all i could do to hold the fuse in the cradle during run up..
found a problem all need to check......................ALERT
loosen your elevator,rudder and wing clamps. pull the surface away far enough to have pin clear the mount. now tighten the screw to the clamp mount with all you got. i used a ball driver and did this to all the clamps then loosen and insert surface and clamp tight with confidence. i found before doing this i had the elevator clamps super tight with surface in and still i could pull the left elvator half right out with my hands........no matter how hard i tried to tighten it i still could pull it loose after. then i did the above and now it is tight as heck going no where now.. glad i caught this.........hope this helps others.
also i setup my full flaps with crow and used a flight mode linked to the flap switch to activate the use of a fresh trim for the elevator and ailerons when in the position half flap and full flap. this will allow me to fine tune the amount of down elevator needed when deployed and yet go back to level flight original trims when i switch flaps to full up pos 1...i have a starting amount of down elevator in both pos 2 and pos 3 using the flap setup but now i can override that by trimming while in that position and once on the ground i can transfer that added change of trim to the regular flap setting mode and get it spot on for future flights. then the so called sub trim in flight mode becomes a windy to calm day adjustment at best if even needed.
12-17-2018, 04:30 AM
#399
My Feedback: (1)
Join Date: Apr 2011
Location: Batavia, OH
Posts: 39
Likes: 0
Received 0 Likes
on
0 Posts
just ran the swiwin 140b it is a beast.. all i could do to hold the fuse in the cradle during run up..
found a problem all need to check......................ALERT
loosen your elevator,rudder and wing clamps. pull the surface away far enough to have pin clear the mount. now tighten the screw to the clamp mount with all you got. i used a ball driver and did this to all the clamps then loosen and insert surface and clamp tight with confidence. i found before doing this i had the elevator clamps super tight with surface in and still i could pull the left elvator half right out with my hands........no matter how hard i tried to tighten it i still could pull it loose after. then i did the above and now it is tight as heck going no where now.. glad i caught this.........hope this helps others.
also i setup my full flaps with crow and used a flight mode linked to the flap switch to activate the use of a fresh trim for the elevator and ailerons when in the position half flap and full flap. this will allow me to fine tune the amount of down elevator needed when deployed and yet go back to level flight original trims when i switch flaps to full up pos 1...i have a starting amount of down elevator in both pos 2 and pos 3 using the flap setup but now i can override that by trimming while in that position and once on the ground i can transfer that added change of trim to the regular flap setting mode and get it spot on for future flights. then the so called sub trim in flight mode becomes a windy to calm day adjustment at best if even needed.
found a problem all need to check......................ALERT
loosen your elevator,rudder and wing clamps. pull the surface away far enough to have pin clear the mount. now tighten the screw to the clamp mount with all you got. i used a ball driver and did this to all the clamps then loosen and insert surface and clamp tight with confidence. i found before doing this i had the elevator clamps super tight with surface in and still i could pull the left elvator half right out with my hands........no matter how hard i tried to tighten it i still could pull it loose after. then i did the above and now it is tight as heck going no where now.. glad i caught this.........hope this helps others.
also i setup my full flaps with crow and used a flight mode linked to the flap switch to activate the use of a fresh trim for the elevator and ailerons when in the position half flap and full flap. this will allow me to fine tune the amount of down elevator needed when deployed and yet go back to level flight original trims when i switch flaps to full up pos 1...i have a starting amount of down elevator in both pos 2 and pos 3 using the flap setup but now i can override that by trimming while in that position and once on the ground i can transfer that added change of trim to the regular flap setting mode and get it spot on for future flights. then the so called sub trim in flight mode becomes a windy to calm day adjustment at best if even needed.
Thanks for the alert about the clamps on the flying surfaces. I will double check mine now. Glad to hear it was caught before anyone lost a flight surface, hopefully others will see this and pass it along.
That is a good check that I had not done yet. Thank you.
12-17-2018, 11:51 AM
#400
just ran the swiwin 140b it is a beast.. all i could do to hold the fuse in the cradle during run up..
found a problem all need to check......................ALERT
loosen your elevator,rudder and wing clamps. pull the surface away far enough to have pin clear the mount. now tighten the screw to the clamp mount with all you got. i used a ball driver and did this to all the clamps then loosen and insert surface and clamp tight with confidence. i found before doing this i had the elevator clamps super tight with surface in and still i could pull the left elvator half right out with my hands........no matter how hard i tried to tighten it i still could pull it loose after. then i did the above and now it is tight as heck going no where now.. glad i caught this.........hope this helps others.
also i setup my full flaps with crow and used a flight mode linked to the flap switch to activate the use of a fresh trim for the elevator and ailerons when in the position half flap and full flap. this will allow me to fine tune the amount of down elevator needed when deployed and yet go back to level flight original trims when i switch flaps to full up pos 1...i have a starting amount of down elevator in both pos 2 and pos 3 using the flap setup but now i can override that by trimming while in that position and once on the ground i can transfer that added change of trim to the regular flap setting mode and get it spot on for future flights. then the so called sub trim in flight mode becomes a windy to calm day adjustment at best if even needed.
found a problem all need to check......................ALERT
loosen your elevator,rudder and wing clamps. pull the surface away far enough to have pin clear the mount. now tighten the screw to the clamp mount with all you got. i used a ball driver and did this to all the clamps then loosen and insert surface and clamp tight with confidence. i found before doing this i had the elevator clamps super tight with surface in and still i could pull the left elvator half right out with my hands........no matter how hard i tried to tighten it i still could pull it loose after. then i did the above and now it is tight as heck going no where now.. glad i caught this.........hope this helps others.
also i setup my full flaps with crow and used a flight mode linked to the flap switch to activate the use of a fresh trim for the elevator and ailerons when in the position half flap and full flap. this will allow me to fine tune the amount of down elevator needed when deployed and yet go back to level flight original trims when i switch flaps to full up pos 1...i have a starting amount of down elevator in both pos 2 and pos 3 using the flap setup but now i can override that by trimming while in that position and once on the ground i can transfer that added change of trim to the regular flap setting mode and get it spot on for future flights. then the so called sub trim in flight mode becomes a windy to calm day adjustment at best if even needed.
thats good practice with every clamp and it is indeed a valueable tip - thank you.
it is mandatory to always pull all control surfaces to make sure they are tight when you assemble the model at the field every time.